- Location
- Covington, Va
Just a reason to check your compressor.Is it an omen where you gat a full inner rim leak 2 days before a big weekend out of town where you’ll be testing your equipment in the crap and snow?

Just a reason to check your compressor.Is it an omen where you gat a full inner rim leak 2 days before a big weekend out of town where you’ll be testing your equipment in the crap and snow?
YesAre you getting a P4X diff?
Auto? You probably want to grab the driveshaft. Don't forget the front diff too.
This is all of course assuming it’s in good condition.Auto? You probably want to grab the driveshaft. Don't forget the front diff too.
If there's axle grease buildup from a leaky axle seal, walk away. If you have to replace the axle shafts you're out another grand.Xterra. From a 2012. Not sure of the mileage but they’re only charging $300, which is $800 less than the next cheapest option I’ve found.
Well you can replace the joints on the shaft with yours but the shaft will be the right length.This is all of course assuming it’s in good condition.
Bet the code is P0101. I get the same thing and have had my shop check for other codes or anything else with their higher quality scanner(s), and they didn't find anything. Their advice was to keep an eye on it, keep resetting the CEL, just do my normal air filter maintenance and clean the sensor at the same time. I do have a ScanGauge attached to the OBD port so I can check codes when the CEL light comes on and reset the P0101 code on the fly.I had a cel come on tue and the shop replaced the MAF sensor with a hitachi one and 2 day's later the light came back on . When they checked it out yesterday they said the ECM is not recognizing that the new MAF is functioning but there big ODB system is showing that it's working . They also said there was a bulletin out about this from Nissan . They also said that since it's a small # Nissan doesn't have to do a recall but they can flash [download] stuff back into your ECM that will resolve this issue for a modest little charge $$$$$$$$$$$$$$$$$$$$$$$$$$$$$$$.
Has anyone else had this type of issue. The MAF sensor they took out was some POS sub-standard make that looked almost new . Think they said Duralast . Could the ECM have relearned something from this garbage sensor that made it not recognize the new one , I don't know !
I was told I could drive it like this for right now since the MAF is functioning and of course I'm supposed to leave for the Nexterra/Rausch event today . "" Talk about perfect timing ""
ANY and ALL comment's-feedback would be appreciated .
No clunk on my 2.0’s. For what I’ve read, there’s appears to be an issue when people use their Nissan mounting hardware with RadFlo’s of either size. Google “RadFlo clunk how I fixed it PBR” and read the post. Yes I replaced my hardware when I first installed my rads so I don’t have a comparison to the old Nissan bolts. I will be TS-ing when the weather breaks in March/April so I’ll be cleaning them up and checking their wear after almost 20k miles on them.Does the Radflo 2.0 extended travel have the “clunk?” Or is that only the 2.5” ones?
Now I’m debating between Radflo and the MK84 mII.
Same sameNo clunk on mine using 2.0 TS Rads and OE hardware.
Good old PB did the trick! Just removed the original (Date code 1211!) spare, complete with rusty wheel and an animal nest of some sort. Once I got it freed up, I coated the chain with the stuff before winding it back up. I put the spare in my garage for now, since the tire is well past its freshness date, and the wheel it's mounted to looks a bit suspect as well, but that may just be surface corrosion.PB Blaster works equally as well. But I’ve had some really good luck with this other stuff.
Yeah, it looks pretty simple, based on the videos I've watched. Might need an extra set of hands to hold thing thing, but I've got a jack so hopefully that'll do the job.Hitch is easy peasy once the tire is out of the way.
Yeah, it looks pretty simple, based on the videos I've watched. Might need an extra set of hands to hold thing thing, but I've got a jack so hopefully that'll do the job.
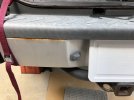
I need to repaint mine as well, once it gets a bit warmer.Last summer I repainted our OEM bumper due to some rust that was appearing, and when I reinstalled the hitch I used a couple of straps on either end of it to help support it. Wish I had a photo of it. but basically had the hatch open, straps looped around each side of the hitch, and up to the rear seat strikers. I used 1" webbing straps with cam buckles so I could pull them tighter or let some out to adjust it. Worked great and made it a lot easier to wrangle the hitch when working solo, it would have been a bit awkward otherwise.
Mine is rusting around the left license plate light. I'm thinking I'll redo it in black.Painting the bumper really cleaned up the look of the back end. Also used a heat gun on the plastic cover, and that helped darken it up a bit although it was hard to get it even and it's already faded a bit. Utah sun is brutal and it's always parked outside.
I had the same rust spots around the lights and even a dent from the previous owner. I also painted it black. Love the new look. Just some advice if you do paint it. Remove the bumper and prep it fully. Especially behind and around the inner framework. These bumpers are prone to rust and in my opinion their paint job was garbage. So far 4 years in NY winters and my rattle can makeover still holding strong. If you have rust at the license plate light, it’s probably elsewhere too.Mine is rusting around the left license plate light. I'm thinking I'll redo it in black.
Get a bolt started on one side just a few threads. Then lift up the other side and thread in another bolt. That’s how I did mine. It’s a bit on the cumbersome side, but I’m used doing work like this on my back in the mud. So a garage floor was luxurious to me.Yeah, it looks pretty simple, based on the videos I've watched. Might need an extra set of hands to hold thing thing, but I've got a jack so hopefully that'll do the job.
Yeah, I saw some on the inside of it when I was underneath getting the spare tire off, so I'll definitely do both sides of it.I had the same rust spots around the lights and even a dent from the previous owner. I also painted it black. Love the new look. Just some advice if you do paint it. Remove the bumper and prep it fully. Especially behind and around the inner framework. These bumpers are prone to rust and in my opinion their paint job was garbage. So far 4 years in NY winters and my rattle can makeover still holding strong. If you have rust at the license plate light, it’s probably elsewhere too.
I'll probably just get my little brother to come over and hold it in place while I install the fasteners. After all, that's what little brothers are for!Get a bolt started on one side just a few threads. Then lift up the other side and thread in another bolt. That’s how I did mine. It’s a bit on the cumbersome side, but I’m used doing work like this on my back in the mud. So a garage floor was luxurious to me.
2nd gen people, how do I get a 2nd gen to switch into 4wd when the abs isn't working.
I of course say this as a “do at your own risk” thing but if you’re putting the exact same coils back on that you’re taking off, then you don’t have to actually compress/release the springs. Paying attention to the load limits and quality of them, you could in theory just wrap ratchet straps all around the spring tight enough that they don’t move more than the amount of thread you have left on the perch. In my case just three 1.5” ratchet straps were able to actually compress my 2608 springs enough for me to twist them, and in your case you just want to hold them in place.Thinking about changing the anodized red parts of my MKII TS coilovers to a blue to match my accent theme. That means I want to take them apart and pull the springs.
A: am I being crazy and anal?
B: if I do this, I’d like to have my own spring compressor for future usage. Best choice from the peanut gallery without killing the account. Safety first for suggestions. I know the danger.


Looks great, like Tony would say it.Ok, since I’m in a kick with paint and protection, here’s another one. Has anyone done anything to protect or customize their read shocks? Mainly Radflo? I bought some Duplicate-Color MetalCast Blue and toned my Bora wheel spacer logos. Then I did a test on an old aluminum water bottle for that anodized finish. Contemplating that on the rear shock bodies for color and corrosion protection from the salt belt. Thoughts, comments, likes, dislikes?
View attachment 21588View attachment 21589
I'd be curious how well it holds up. I wouldn't mind doing my rear Rads in blue. Especially since they're still sitting in the garage.Ok, since I’m in a kick with paint and protection, here’s another one. Has anyone done anything to protect or customize their read shocks? Mainly Radflo? I bought some Duplicate-Color MetalCast Blue and toned my Bora wheel spacer logos. Then I did a test on an old aluminum water bottle for that anodized finish. Contemplating that on the rear shock bodies for color and corrosion protection from the salt belt. Thoughts, comments, likes, dislikes?
View attachment 21588View attachment 21589
Then maybe I should treat this as a durability test. NY winter salt is no slouch for truck torture. Plus I do like how the bottle turned out. Easy enough since mine are sitting against the wall by the basement utility room.I'd be curious how well it holds up. I wouldn't mind doing my rear Rads in blue. Especially since they're still sitting in the garage.

Looks good I vote go for itOk, since I’m in a kick with paint and protection, here’s another one. Has anyone done anything to protect or customize their read shocks? Mainly Radflo? I bought some Duplicate-Color MetalCast Blue and toned my Bora wheel spacer logos. Then I did a test on an old aluminum water bottle for that anodized finish. Contemplating that on the rear shock bodies for color and corrosion protection from the salt belt. Thoughts, comments, likes, dislikes?
View attachment 21588View attachment 21589