
Airmapper
First Fill-Up (of many)
- Location
- Bowling Green, KY
This is how I flushed my Brake fluid on a 2011 with a manual transmission, and while it's likely this holds the same for all 2nd Gen's you will have to confirm your individual applications.
Also note this is the way I did it and not necessarily the best way, use at your own risk. I did attempt to follow all reference material available, mainly a 2010 Nissan Xterra FSM.
You will need:
10mm box end wrench (optional: may need socket)
8mm box end wrench [Manual only] (optional: may need socket)
24 inches of 3/8" ID clear tubing (fuel line)
Catch container for old fluid. (I used a glass jar.)
New DOT 3 brake fluid. (I got a 32oz size and used about 3/4 of it.)
DO NOT use anything other than DOT3. Sometimes DOT 3 & 4 are combined, this is okay as long as the fluid is DOT3 approved.
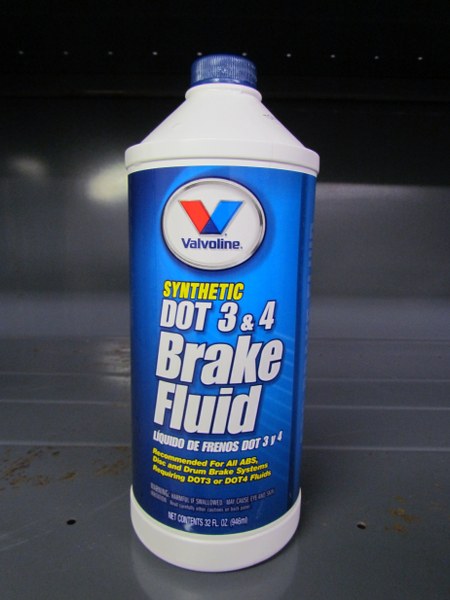
Here is the particular fluid I used:
May also need:
A Turkey baster
RTV Silicone Sealant / adhesive
Jack/ lug wrench from Xterra
First locate and disconnect the electrical connector to the ABS actuator unit.
Press down on the tab at the green arrow. Slide the switch/lock up until it locks in the up position (yellow arrow.) Then carefully pull it out.
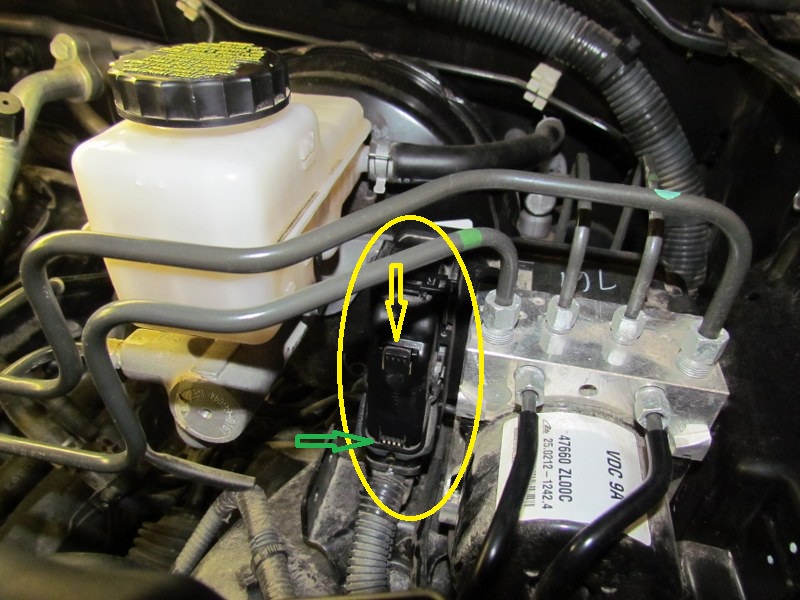
Note: The FSM calls for this method OR disconnecting the battery. Under GI (General Information) it mentions it being necessary to re-set some steering position sensor on re-connecting a battery. This requires a consult device most of us do not have. While it may or may not be an issue, I went the safer route and only disconnected the ABS unit, not the battery, and thus did not power down all the vehicles electronics.
Next drain the majority of the old brake fluid from the reservoir.
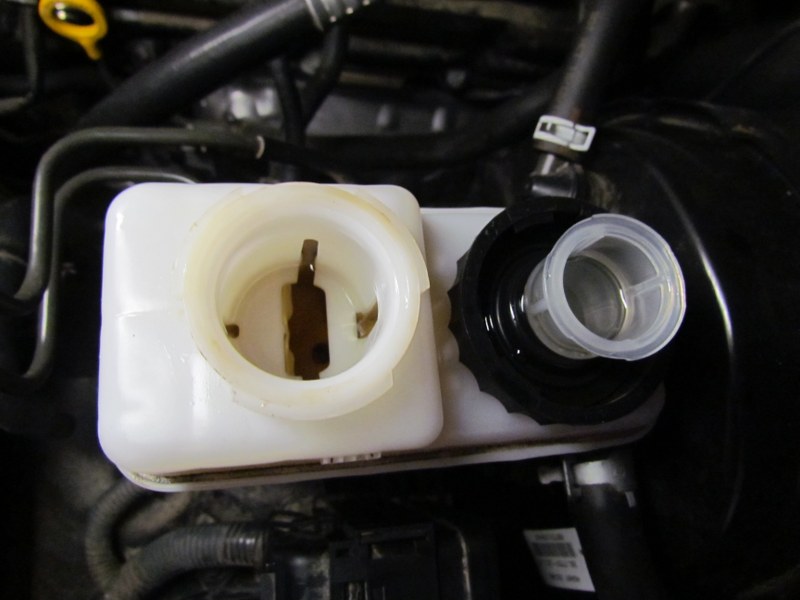
As you can see the opening is quite small. If you do not have an appropriate device to suck the fluid out, here is how I made one.
Get a turkey baster, open up the tip with a knife so that a 4" or so section of the 3/8" clear tube fits in the end. I then used clear RTV to seal it and hold it. This tube fits neatly to the bottom of the reservoir to stir up and suck out fluid.

Note for manual transmission owners:
There is a baffle (see approx. location @ Green arrow below) in the reservoir that prevents fluid from being drained below the clutch pick up line. (Red arrow below.) This allows you to drain the fluid without introducing air at the top of this line.

Now we are to the point we can start flushing. Fill the reservoir with new fluid, and keep an eye on it's level throughout the flushing process. (DO NOT allow it to completely empty and suck in air.)
Now you go to each wheel and find the bleeder. While it is an extra step, I found removing the wheel was the easiest way to comfortably access the bleeders. This gives you ample room to work in a comfortable position.
I found it particularly necessary as one of my bleeders had seized, and removing the wheel allowed me to clean it, apply Kroil penetrating oil, then get a socket on it and carefully tap the ratchet with a hammer to jar it loose. I have 30k miles, and 2 of mine were very tight. You do not want to break a bleeder, so take your time and be careful.
I flushed by the same method as bleeding. Have a helper pump the brake pedal 5 times and hold it down, then loosen the bleeder and drain till they say the pedal "hits the floor" and then tighten the bleeder and repeat until the fluid looks clear and clean. Tighten the bleeder "before" telling your helper to pump the brakes again. This will prevent you from sucking air into the system.
According to the FSM bleeding is done in this order:
Rear Right
Front Left
Rear Left
Front Right
The brake bleeders use a 10mm wrench.
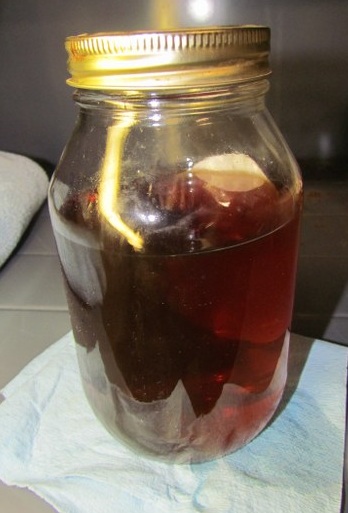
For reference, old fluid is dark like this:
[Manual Transmission Only] Flushing Clutch:
If you have a manual transmission you will also need to flush the clutch line, as it feeds from the same reservoir as the brakes, and of course you want all fresh fluid everywhere.
Here is the clutch end's bleeder (see arrow.) It uses an 8mm box end wrench.

It's similar to the brake flushing process, but a little different. Have your helper pump the clutch a few times, and hold it down. Release the bleeder and watch the clutch paddle return. Lock the bleeder, and tell your helper to repeat the process. Continue until clean and clear fluid comes out.
Make sure you have the cap back on the reservoir, plug the ABS back up, and carefully test the brakes and clutch before driving anywhere.
Hope someone finds this useful. I was somewhat apprehensive starting this not having a lot of info to go on. Having done it though, it was fairly easy and like most things can be done at home rather than paying a shop.
Also note this is the way I did it and not necessarily the best way, use at your own risk. I did attempt to follow all reference material available, mainly a 2010 Nissan Xterra FSM.
You will need:
10mm box end wrench (optional: may need socket)
8mm box end wrench [Manual only] (optional: may need socket)
24 inches of 3/8" ID clear tubing (fuel line)
Catch container for old fluid. (I used a glass jar.)
New DOT 3 brake fluid. (I got a 32oz size and used about 3/4 of it.)
DO NOT use anything other than DOT3. Sometimes DOT 3 & 4 are combined, this is okay as long as the fluid is DOT3 approved.
Here is the particular fluid I used:
May also need:
A Turkey baster
RTV Silicone Sealant / adhesive
Jack/ lug wrench from Xterra
First locate and disconnect the electrical connector to the ABS actuator unit.
Press down on the tab at the green arrow. Slide the switch/lock up until it locks in the up position (yellow arrow.) Then carefully pull it out.
Note: The FSM calls for this method OR disconnecting the battery. Under GI (General Information) it mentions it being necessary to re-set some steering position sensor on re-connecting a battery. This requires a consult device most of us do not have. While it may or may not be an issue, I went the safer route and only disconnected the ABS unit, not the battery, and thus did not power down all the vehicles electronics.
Next drain the majority of the old brake fluid from the reservoir.
As you can see the opening is quite small. If you do not have an appropriate device to suck the fluid out, here is how I made one.
Get a turkey baster, open up the tip with a knife so that a 4" or so section of the 3/8" clear tube fits in the end. I then used clear RTV to seal it and hold it. This tube fits neatly to the bottom of the reservoir to stir up and suck out fluid.
Note for manual transmission owners:
There is a baffle (see approx. location @ Green arrow below) in the reservoir that prevents fluid from being drained below the clutch pick up line. (Red arrow below.) This allows you to drain the fluid without introducing air at the top of this line.
Now we are to the point we can start flushing. Fill the reservoir with new fluid, and keep an eye on it's level throughout the flushing process. (DO NOT allow it to completely empty and suck in air.)
Now you go to each wheel and find the bleeder. While it is an extra step, I found removing the wheel was the easiest way to comfortably access the bleeders. This gives you ample room to work in a comfortable position.
I found it particularly necessary as one of my bleeders had seized, and removing the wheel allowed me to clean it, apply Kroil penetrating oil, then get a socket on it and carefully tap the ratchet with a hammer to jar it loose. I have 30k miles, and 2 of mine were very tight. You do not want to break a bleeder, so take your time and be careful.
I flushed by the same method as bleeding. Have a helper pump the brake pedal 5 times and hold it down, then loosen the bleeder and drain till they say the pedal "hits the floor" and then tighten the bleeder and repeat until the fluid looks clear and clean. Tighten the bleeder "before" telling your helper to pump the brakes again. This will prevent you from sucking air into the system.
According to the FSM bleeding is done in this order:
Rear Right
Front Left
Rear Left
Front Right
The brake bleeders use a 10mm wrench.
For reference, old fluid is dark like this:
[Manual Transmission Only] Flushing Clutch:
If you have a manual transmission you will also need to flush the clutch line, as it feeds from the same reservoir as the brakes, and of course you want all fresh fluid everywhere.
Here is the clutch end's bleeder (see arrow.) It uses an 8mm box end wrench.
It's similar to the brake flushing process, but a little different. Have your helper pump the clutch a few times, and hold it down. Release the bleeder and watch the clutch paddle return. Lock the bleeder, and tell your helper to repeat the process. Continue until clean and clear fluid comes out.
Make sure you have the cap back on the reservoir, plug the ABS back up, and carefully test the brakes and clutch before driving anywhere.
Hope someone finds this useful. I was somewhat apprehensive starting this not having a lot of info to go on. Having done it though, it was fairly easy and like most things can be done at home rather than paying a shop.