outback97 (slowly) builds a studio for Mrs. outback97

outback97

Wheeling
Supporting Member
Location
SLC, Utah
Hey guys. Last spring I asked for some utility trailer advice for a project I was getting ready to work on. Well, it got started last summer and isn't quite done yet, but it's getting there. I've been meaning to post some photos since our Xterra has been so integral to this project.

We've been in our little 50's brick house for almost 20 years now. We've loved the historic district neighborhood and the privacy of the backyard, rare for a suburban area, where we couldn't even really see the neighbors homes.

A few years ago, the owners of the house next door decide to boot the tenants they've been renting to and tear down the house, in order to build a monstrously huge thing we refer to as "Mount Avarice". We went from loving our backyard to not even enjoying being out there. Definitely a first world problem, but it's hard to overstate how much we resented this house and what we lost when it got built.

ABLVV86s7b_kDEifzDqvbSnnYMLkdaQgyPAkjPeAbYjBGDF7x7iSTfzUyImnXxM9t0Z5bbZ2hgp9i30RBBLyEdfgc0kxxdTwWwF_51vsy_tVfESDVcontTyL=w2400


My wife had been wanting more space for crafting, and since we had just received a free floor loom from a neighbor, with no space to use it in our small house, it seemed like it was time to do something about both problems. So, we started making plans and clearing the site to give her a studio space and reclaim some of our backyard privacy.


We needed a way to haul 16' sticks of lumber. So I modified an old Thule bike rack with some strut channel (one of my favorite things) and came up with this.

ABLVV86NADyVCbG82ALeCiEu4vS6gO1LkqTn6fwBg7DK03uf4ZT1qaiSiQ1BXHy7QsMODz6ZocbUE5kqsG-MgT-UFB7RfNPZoQbnHmduBz7rv91pRDVUcxTz=w2400


Up until the floor decking, we hadn't needed a trailer. We had the gravel delivered and all the lumber was hauled inside or on the roof.

ABLVV85DUMvu6woFRwn_xSi3Ikluz2rIfDVXVRUL2PDIJ7xAs6cr-i8WIH1eFT_iX1dJ4yJd0dv9UTZv4oAUsbRT497_-kLWjKy9sWfM0Eh99OWwCmGnxbMd=w2400


I was fortunate enough to be able to borrow this 5x10 utility trailer from my old boss. The Xterra has been a fantastic towing vehicle for this type of work.

ABLVV86IkMhGvraXIz2Y94JyV-xv2j-AJlsWSKipCOw7RURl37yVorQbUWK3qevMvCffaUHmBJ4GdiBRfuIexlFLbP4WSHYaUA9jQ7k0ANzqXG2n8VhVhtiu=w2400


The used windows we found in the local classifieds were a tight fit inside, but again the Xterra was perfect for the job.

ABLVV842Bu50C0vLGtIDHBnQfgQdXd_clBjiOLiqDuNwJ5Ro1J-3BJcx3r6pUe93c46QDqCFq_B1bKosm6gDe5VSVunpxqk6iuxdRlZD6gnoohGcc2ASAO2r=w2400


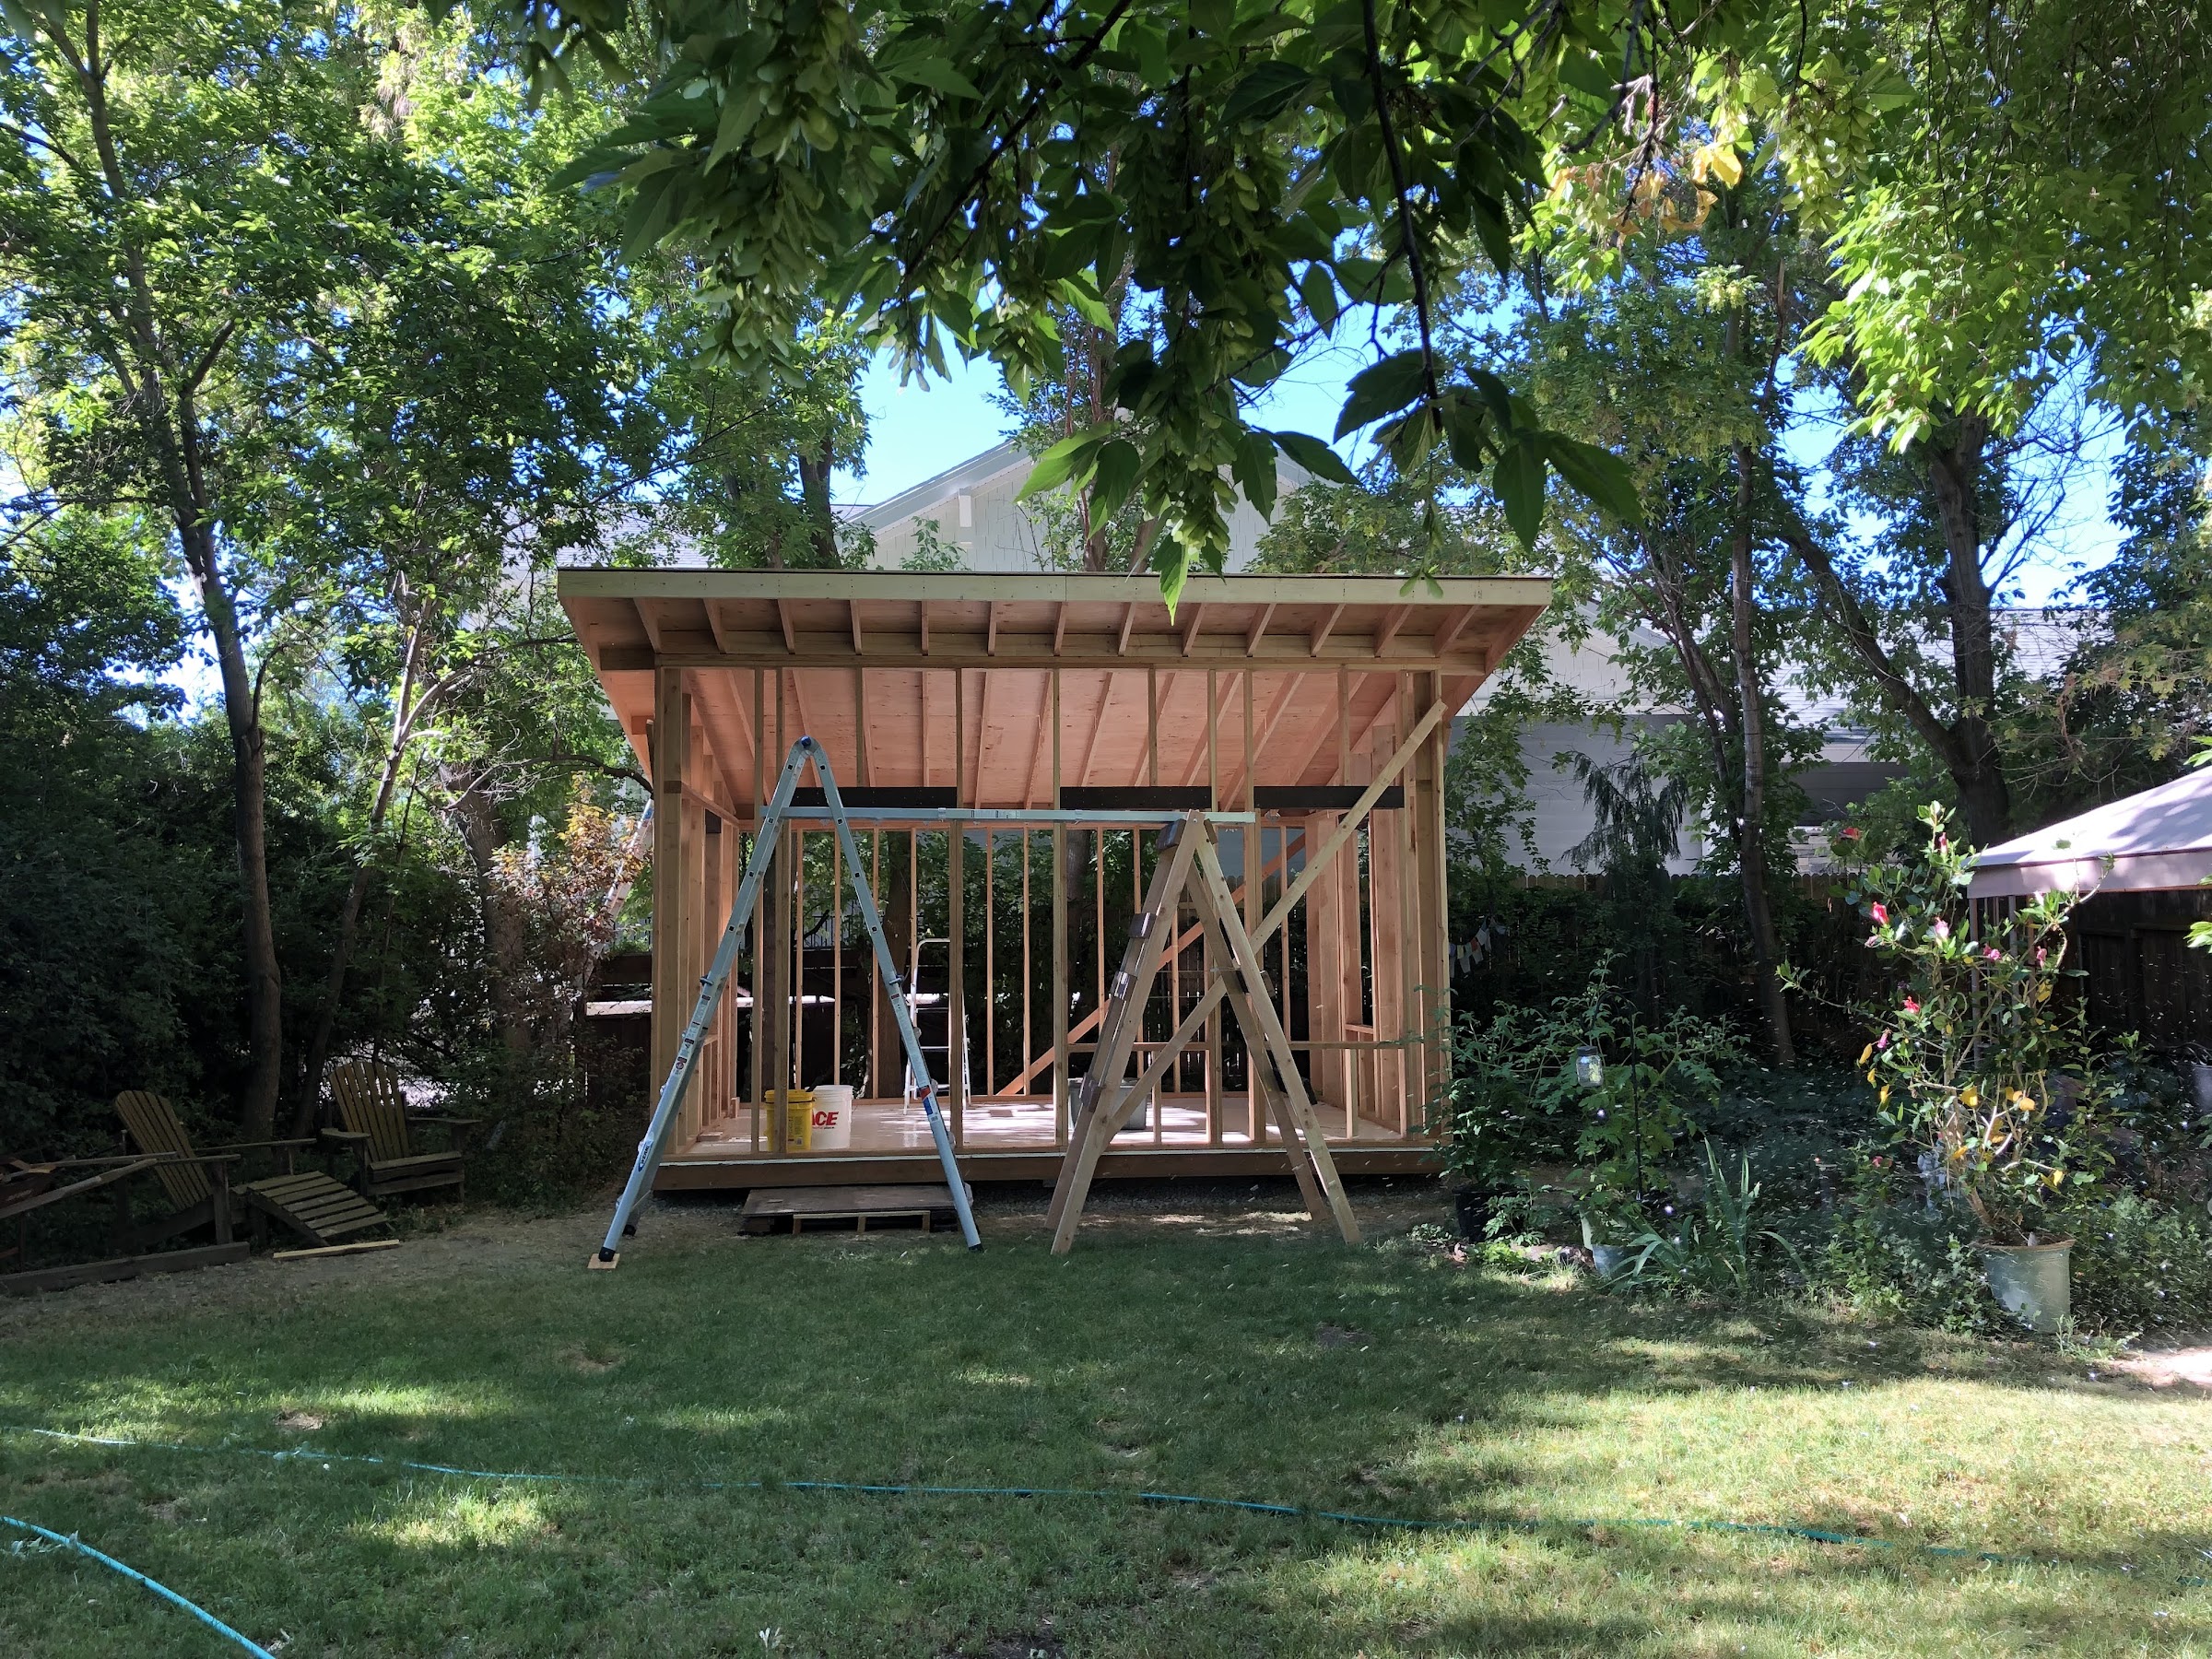
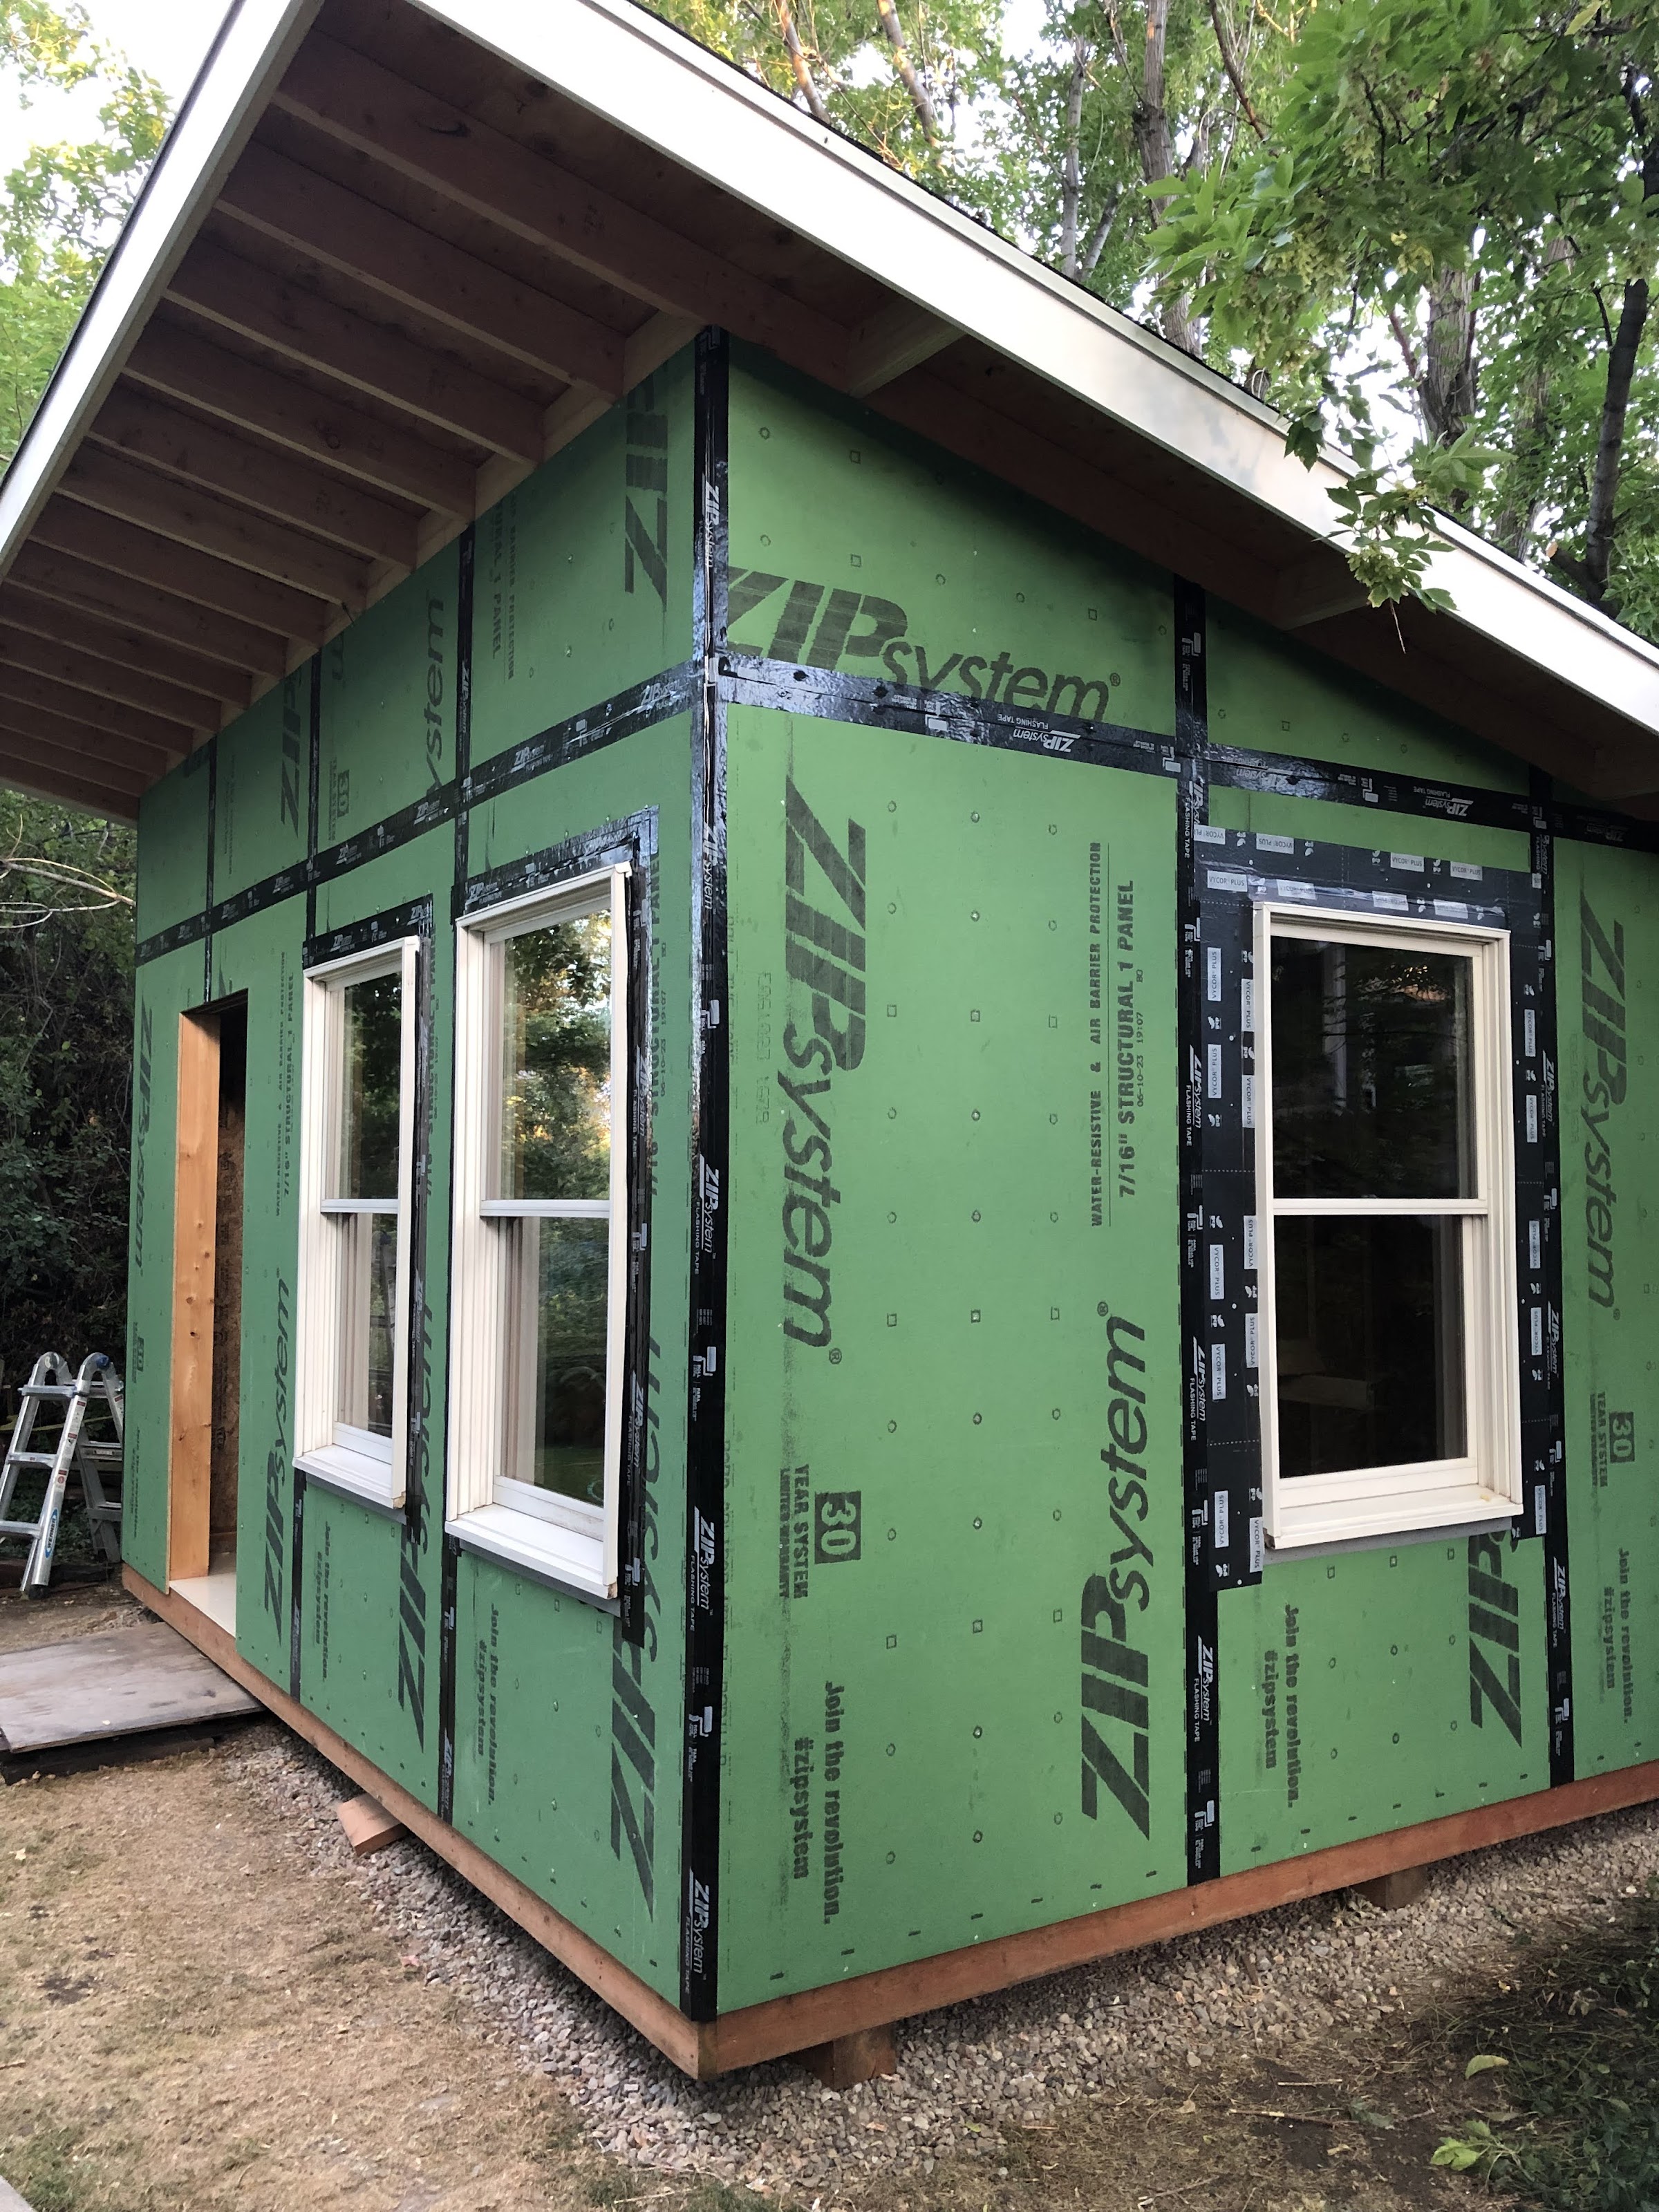
Once we had the windows and could plan our framing, things started to take shape.

ABLVV87uiKHRCxsVD_HNlY24iE0D1YNf95CCwA7TBpQj1HW8Sp64VJpIes1RBblmMRolzJPl0EX1xA54o5myZ2anGyXQNDFMnlTEnnbETMcrkA0KME7hkLxU=w2400
 

outback97

Wheeling
Supporting Member
Location
SLC, Utah
I limited the roof loads to about 200 pounds maximum... here's some 16' rafters and probably the heaviest roof load. I took it easy driving these around and tried to do my shopping early in the morning before there was much traffic.

ABLVV86pWIqLC0RZEmH1GuwNg3NJTfjZ3foZJJ9FL0z7sytd-oihMeeFCaP082TFenln8kvDONiTakX-nAQg5FYMu4R4bZPcRj0pm3xcKlnmL1I7wOpo27fw=w2400


ABLVV85WEXSw9cAWpVKuu8sBcctxtpKci2xt9tvsIK4YIgs9TnFyMB8s3BHM5anxdZFfsx8_hgnXkvsDZTi62T7jfBP7hXNYigpae8eqr7evVOD60LDIsFi9=w2400


With the rafters and roof decking in place, it was starting to feel like a real building.

ABLVV876yKRlldcyZQf_L-5OPZBca5JQe2xeYwwlfIcPF9LCr1iEqXRQHvDlChLchzRstIobir0TKHz9qkwdvaKyTGiP3GQPtxz_uLbBs7AqLSJO9QO-zWtj=w2400


I built some scaffold a-frames which came in handy to do the fascia and other work up off the ground.

ABLVV859x9iHMdBgLCLmevvkise1JdM5JL87yB84jO4eoPm5HrSLXJ4oMNlRWfFmijuJlXfBzWJWK3_nKcBwuRQzmfuVCSc01lxIgvW6o60y_U8UuQtYo8xd=w2400


The utility trailer proved essential again to get materials to start sheathing.

ABLVV84LV2f1d5_LkCmevbR6P8Yz5Chb3aj_V6qNMXJ0_SegCP3cfnYN0p3jxHpj92Z5XO6GtXgQO7clqGz05_MlE3v-APu7CpMnpwSLOuf_rhMP0G4EYD4b=w2400
 
Last edited:

outback97

Wheeling
Supporting Member
Location
SLC, Utah
We went through a lot of thinking about how to clad this building. We definitely didn't want it to look like a boring utility shed, it needed to be more distinctive and pretty to look at.

We had a neglected pile of cedar fence boards that had been sitting at the back of the lot for years.

ABLVV87zmpXfQz6ynuRFWL4Gzmby4lENyPvjqkCWhM4dgUU9CAVtUfwN_HN6TAxxNTzN6Quf1WIdLtG5hT5O0J-rcVacvsu0geZ1MHaAGLKcVqPNjEf0O4vy=w2400


I'm a big fan of using what you have and not wasting things if you can, and I love the look of natural wood.

I had to cull some rotten boards, but I took a few and cleaned them up, cutting them into faux shake shingles, and after a ridiculous amount of labor in cleaning, scrubbing, drying, cutting, and staining, those boards and a few unweathered ones I had in storage eventually turned into this.

ABLVV84bI2VC1k95FepF0c0VXNq2nRBscc97PO2tVEaYTX0K1YO4tPGv1jR9CjG3M7eA5Ud8iUHT8RAcazOTm4sKDRyoFKbIz4UF05QUfiIrWIIneJ_TNIrI=w2400


ABLVV84eFDoQiwgmheTsKbmOuNQaHCAqlj1e2CCAKNnTdHJ_mruJ3UezZ976lj5OOfkObQ9YH4h7CsWkbX3lsB2AU3Av3ZDOZgI7FnKhheL5thKdOem2Hh5I=w2400


We finished the cedar cladding just before Thanksgiving, and except for the addition of the trim, the exterior is pretty much at this stage now.

ABLVV84zxN7igEMrSHc9ABWRB46iDiYGjt4KjBCy5kHDtX2zpvGKWgnkLVkwT0j5RZbrFTNSPgrlXaCDpv3sO2hFqllnXeIuTkEQz6PpwR0cod9ARzBOOflp=w2400


I took some time off for holidays and winter weather, but lately I've been working on the insulation. I got a deal on Rockwool so by the time this is done it'll be better insulated than our house.

Stay tuned for more updates.
 
Last edited:

outback97

Wheeling
Supporting Member
Location
SLC, Utah
Thanks guys. It continues to be a fun, challenging, and humbling project. Did some more insulation work over the weekend and preparing for electrical next.
 

outback97

Wheeling
Supporting Member
Location
SLC, Utah
ABLVV84yrKgqBu2xfLwgCpLSATO4tWlPq8EGs1uGi2JbsyTqdCnPnF1Wq1Q6vvG1y05L2_4y5J-MdE7gJ7Iwm7obt0DVp_ePWVAxnDBnnOyhfIPOJgG8LKb7=w2400


I'm hung up on electrical but figured I'd post a pic of the insulation processing. I got a great deal on Rockwool R30 but it's for 2x8 walls, and mine are 2x6. What to do? Get a bigass bread knife and build a cutting table out of 2x6's to make my own 2x6 batts. The boards in the cutting table also allow cutting vertically to fit the 16" on center ceiling rafters. I'm using the shaved off pieces to fill the back wall, which is constructed with staggered 2x4 studs between 2x6 top and bottom plates. I did the back wall this way in the hopes of reducing noise coming from the neighbor. Decoupling most of the the outside sheathing and interior drywall is supposed to be effective at reducing noise.


ABLVV87xbKidEVTQDtKQ0DLqIcyWE86GgqqergbdvU5JaTIU0DTTaWKsrpHdm17yUJCC5t4JuGMHUFb1ZNFfgj4POT-niTBxlzwF64zQzXe-eXlZA0bnNF-u=w2400


When I first started this project I was convinced I wanted an off grid electrical setup. I bought a LiFePO4 battery and inverter. Then I started thinking realistically about power needs and the fact that we don't have good sun exposure for solar, and that we'd probably want a space heater and small window A/C. Heating and cooling are really energy intensive. So then it was, maybe I can just use temporary power with an extension cord. That has moved on to, let's get power from the house.

I've been trying to educate myself on the relevant NEC requirements and how I could do everything safely and up to code. I might still hire an electrician but haven't had much luck even getting call backs, and I would prefer doing as much as I can DIY. I may end up with a hybrid solution where I do some work and they do the rest, we'll see how that goes.

Right now I'm trying to figure out how to get power from the house. It's either somehow get it from the main breaker with currently no twistouts pictured here, or from the interior panel. Main breaker is not a simple DIY thing. Interior panel is not easy to get power from either, since my attic is very low clearance and my walls are plaster and lath, and the house is obviously brick. The other decision is MWBC (multi wire branch circuit) or feeding a subpanel in the studio. There's pros and cons to both.

Once I figure out getting the wire to this point on the house, it's just a simple ~70' trench through our clay soil :D
 

Muadeeb

Nissan al Gaib
Admin
Location
Dallas
Not a fan of MWBC because if you use a single gang breaker and only one hot leg trips, then the tripped leg may still be energized due to a back feed of the 2nd hot. Two gang breakers typically mean 240v so that may confuse you down the line. My suggestion would be small sub panel for the She shed, or run as many 12AWG feeds in conduit as you need.
 

outback97

Wheeling
Supporting Member
Location
SLC, Utah
Not a fan of MWBC because if you use a single gang breaker and only one hot leg trips, then the tripped leg may still be energized due to a back feed of the 2nd hot. Two gang breakers typically mean 240v so that may confuse you down the line. My suggestion would be small sub panel for the She shed, or run as many 12AWG feeds in conduit as you need.
Great information, thanks! You can probably tell I'm new to this stuff but trying to learn.

As I understand it a subpanel would require >18" trench versus >12" trench with a GFI protected MWBC, grounding rods, higher gauge wire to the building, and less flexibility about where I put it in the studio. Those are really the only downsides. The advantages are sounding more and more worth it.
 

Muadeeb

Nissan al Gaib
Admin
Location
Dallas
Sub would be grounded back to the house, so you shouldn't need the ground rods. Higher gauge wire, yes, as you'll have the two hots and a neutral feeding the entire load. Not sure what the load would be, but some form of HVAC, and whatever equipment she needs I assume. Probably 30A for HVAC, two 15A branch circuits for random loads and lights, maybe a dedicated 15A if she has something big. 60A feeder to the building likely which would mean 2 AWG (don't quote me). Definitely at the point you need to be talking to a real sparky. Doubly so with not wanting to work in the main breaker panel. Depending on the HVAC setup, you might even get away with a single 120v leg feeding the building.

Just for clarity, I'm not an electrician, just a guy who's seen way too much DIY TV and is trying to run his own dual 30A circuits for a personal backup network location. I only work in a panel if the whole thing is cold, including the incoming feed. My stuff is 8AWG, two hots and two neutrals to make sure they're isolated, even though I could get away with the MWBC if I wanted. And shoving all that through 3/4" conduit is not fun despite it being within the fill size.
 

Prime

Shut up Baby, I know it!
Admin
Location
Denver Adjacent
Depending on distance, it may be prudent to run new ground rods. If everything has to be inspected, that'll make the inspector happy to see redundant grounds.

You can't pull off the meter base without a separate disconnect switch. Not a breaker, but pull from the house side of the mains with a shutoff before it runs across the yard. Which should be easy since it's on the back of the house.
 

outback97

Wheeling
Supporting Member
Location
SLC, Utah
Sub would be grounded back to the house, so you shouldn't need the ground rods. Higher gauge wire, yes, as you'll have the two hots and a neutral feeding the entire load. Not sure what the load would be, but some form of HVAC, and whatever equipment she needs I assume. Probably 30A for HVAC, two 15A branch circuits for random loads and lights, maybe a dedicated 15A if she has something big. 60A feeder to the building likely which would mean 2 AWG (don't quote me). Definitely at the point you need to be talking to a real sparky. Doubly so with not wanting to work in the main breaker panel. Depending on the HVAC setup, you might even get away with a single 120v leg feeding the building.

Just for clarity, I'm not an electrician, just a guy who's seen way too much DIY TV and is trying to run his own dual 30A circuits for a personal backup network location. I only work in a panel if the whole thing is cold, including the incoming feed. My stuff is 8AWG, two hots and two neutrals to make sure they're isolated, even though I could get away with the MWBC if I wanted. And shoving all that through 3/4" conduit is not fun despite it being within the fill size.

Interesting stuff, I agree about not working on live circuits. Is your situation a detached building or attached to the main house? I'm also 100% not an electrician, but as far as I can tell, per the 2020 regs that we use here in Utah, NEC 250.32(A) says a detached building needs a "grounding electrode system". There's an exception for a single circuit, which can also mean a MWBC.

I think a single 20A circuit would cover the power needs, even including occasional space heater or efficient inverter window AC unit. But, if down the road we wanted to upgrade to a mini split, I'll wish that I had some fatter wire and a subpanel.

I've started the process of trying to get an electrician to come out and quote me. I'm hoping I can find someone willing to do just the technical hardcore part of the whole job. They're clearly not lacking for work and there's a lot of people out there with more dollars than DIY willingness, so we'll see how that goes. While I was typing this I got confirmation of a guy coming out on Monday, so hopefully I'll learn some more from that.


Depending on distance, it may be prudent to run new ground rods. If everything has to be inspected, that'll make the inspector happy to see redundant grounds.

You can't pull off the meter base without a separate disconnect switch. Not a breaker, but pull from the house side of the mains with a shutoff before it runs across the yard. Which should be easy since it's on the back of the house.

Thanks Prime. My plan is to do it legally and code compliant so that means a permit and inspection(s) and I do believe I need ground rods to meet the code I mentioned above. If I hire an electrician he'll do that process, but I'm still hoping for a scenario where I can do most of the work to save money. The materials for the whole building to this point has been $6K, so ideally I don't want to spend thousands more just on electrical.

A couple months ago I had a neighbor who is an electrician spend some time with me going over how I could do this project. I don't know him well but he's a friendly guy, and I hoped he would follow through on what he said, about helping me sketch up plans, helping me select materials, and hooking me up with deals on some old stock in his shop... but unfortunately none of that actually happened, and he's been nearly impossible to reach since.

"pull from the house side of the mains with a shutoff before it runs across the yard"... see this is the biggest part I don't yet understand. This is the part that requires a legit electrician, yes? Or do you have an idea in mind about how I could safely do this? My electrician neighbor made it sound pretty trivial to tie into power here, but I've since come to understand it's not quite so simple and I still don't have a clue how he was proposing to do it. I texted him last weekend and he said he'd sketch it out for me the next day, but again nothing, so I've pretty much given up on that option.

I wonder if I could get an electrician to set me up with a DIY accessible and easy to shut off point to access power here, and I take it the rest of the way from there (conduit, wire pull to building, grounding rods, enter building, subpanel, interior wiring). Hoping to discuss options like that with the guy coming out Monday.
 

Prime

Shut up Baby, I know it!
Admin
Location
Denver Adjacent
"pull from the house side of the mains with a shutoff before it runs across the yard"... see this is the biggest part I don't yet understand. This is the part that requires a legit electrician, yes?
Unfortunately, any time you have to get into the meter base, you're SUPPOSED to have an electrician do it. Liability and shiat. The law is that way so that if you go in there and kill yourself your family can't sue the power company.
 

Muadeeb

Nissan al Gaib
Admin
Location
Dallas
I think this is what the neighbor was suggesting
Neighbor suggestion.png

This is what I'm suggesting
Simple subpanel.png

My thought was since it was the same utility drop and only a 70' difference the same grounding point should suffice. It's not that different than having a large house with a single feed point. You have a professional coming, so defer to their opinion. And if you're going to run one circuit out there, might as well run two.
 

Prime

Shut up Baby, I know it!
Admin
Location
Denver Adjacent
Depending on local code, the disconnect (top image) may be required because of the detached structure. That is also what I was talking about in regards to getting at the "house side of the mains."

The 2nd diagram is a standard sub panel setup. Which, if code allows where @outback97 is, would be cheaper and not require an electrician.
 

outback97

Wheeling
Supporting Member
Location
SLC, Utah
Unfortunately, any time you have to get into the meter base, you're SUPPOSED to have an electrician do it. Liability and shiat. The law is that way so that if you go in there and kill yourself your family can't sue the power company.

Yes that makes sense and I don't really have interest in working with live circuits. It's really a bummer that it hasn't panned out for my neighbor to assist, I was looking forward to working with him and returning the favor when he had need of some help down the road. I offered to pay him some cash for his time, but he declined. He probably just has too much going on to devote any time to it and by outward appearances isn't lacking any money.

I think this is what the neighbor was suggesting
View attachment 32427

This is what I'm suggesting
View attachment 32425

My thought was since it was the same utility drop and only a 70' difference the same grounding point should suffice. It's not that different than having a large house with a single feed point. You have a professional coming, so defer to their opinion. And if you're going to run one circuit out there, might as well run two.

Awesome sketches, thank you for taking the time to make those! I think we're on the same page as to the second example being what one would do as DIY.

The first, neighbor suggested example, was appealing to me in theory because it's all outside work that doesn't involve crawling in the attic or drilling through anything. This is what it looks like working on my attic... crawling on plywood planks laid over the piles of cellulosic insulation, without enough room to sit upright or barely roll over. Not shown are the random fields of extra long roofing nails sticking down from the roof decking. Fun times.

ABLVV87e93pAUs_E0F56aHa_34_VJ6sH_F9jdPqP-4J46MAciRB3q-WKdUuO5vn0O3Y30HcJlE-vq4BmWtnQCOoKS9BOmfrJoQnTD0J3P1QYJu-o3URxOOEj=w2400
 

outback97

Wheeling
Supporting Member
Location
SLC, Utah
Little electrical update. I met with two different electricians this week. It was interesting to me how different their approaches were, and really everything about them was totally different.

Electrician #1 said short of a full main panel replacement for thousands of dollars, no way to get power from by the back door. He said they will not "double tap" without any real explanation for what that means, I take it that would be two conductors in a breaker made for one. He suggested a breaker in the interior panel, run NM wire across attic, down through soffit and junction to THWN through conduit, which certainly is an option that'd work. He didn't seem interested in a cooperative option where I do some work, other than the trench, which he did not include in his $2800 quote.

Electrician #2 was a referral from a good friend, much more communicative and open to sharing the work, and is someone I think we'd actually enjoy working with. His suggestion was a quad breaker in the main panel next to the meter, then splitting from that breaker to the AC and to the conduit and studio. He quoted us $500 to essentially do just the heavy lifting parts and consult and review my work, and advise us what to get and to do.

I've posted some questions elsewhere online, and in addition to the quad breaker coming up, some have suggested a larger breaker replacing the current 30A A/C breaker, feeding a subpanel, which then splits off to the AC and studio.

Current plan is to work with electrician #2 and DIY much of it. I'll update this when I have something new.
 

outback97

Wheeling
Supporting Member
Location
SLC, Utah
I love this shot. Great idea and placement, to reclaim your backyard privacy. I meant to say that the first time, that I love the placement of the building.
Thanks, it was pretty deliberate and I only wish we could have blocked more. It's about the best we could come up with and has helped a ton with enjoying the yard again.
 

outback97

Wheeling
Supporting Member
Location
SLC, Utah
It's been about a month, time for an update.


AP1GczOU7IJADHwUt_VqpEoeiN94rTZn6mZCCCpJdmLDZbh4Ylc1NXy2ulSqfXvhniBkxyh1-nGTly-DQO5vBnM_2Vd3tI2RDrTODGh37n8nu8U7NcY0ebJo=w2400


I dug a >20" trench about 70', put in 1" PVC conduit, completed the interior rough in wiring, drove a ground rod in, then last weekend had the side job electrician that I mentioned earlier help me hook up the subpanel to a 30/50A quad breaker he installed in the main panel. The 50A half of the quad breaker feeds the studio subpanel with #6 wire that we pulled... pushed actually, since he forgot his fish tape :) but we got it through. I've got two 20A breakers in the subpanel that feed two circuits, will probably add another breaker to directly feed an outdoor outlet just under the panel.

Today the city came out and I passed inspection on my sub rough and rough install, so I'm good to move forward with filling the trench back in, finishing the insulation install, then interior finishing. After that I'll have to pass final inspection.

Stoked and relieved I passed the first two inspections!
 
Last edited:
Top