robcarync
Sliders
- Location
- Raleigh, NC
If you are like me, you have your super cool lifted Xterra, and as a result, have spent more money than you'd like to admit getting alignments done. This post is just a brief explanation of the specs, and documentation of my alignment results and any commentary I have on how it drives. My goal is to help people reduce the number of times they fool around with a lifted alignment, and make people more informed when they are at the alignment shop. Having real examples of results will help interpret your print out at the shop. Post your alignment results up, and offer a review of how it drove and any tire wear issues!
The very first thing: don't bother getting an alignment if you don't put the money up front to get the proper kits and parts to keep your alignment reliable. This means not only UCAs, but also idler arm braces, center links, idler arm bushings, UCA bushings, etc. Especially with larger tires, a non-reinforced steering system won't be able to hold your tires in place reliably. The numbers will look great off the alignment rack, but they will quickly drift after you drive out of the parking lot. In my experience, the stock style center link was the major issue to a reliable alignment. Don't forget to observe the 1/2" gap at the stock bump stop for a better alignment.
Moving on, let's review the commonly accepted alignment specs for a lifted Xterra, and compare them to the stock alignment specs.
Lifted Alignment:
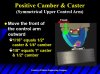
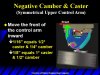
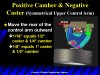
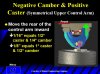
1) Camber: 0 degrees or as close as possible
2) Caster: Maximum caster on passenger side while maintaining zero camber. Adjust driver side caster to be slightly less while maintaining zero camber.
3) Toe In: 0.33 degrees or 0.16 inches of total toe in.
Stock Alignment:
1) Camber: 0.1 degree to 1.1 degree
2) Caster: 1.67 degrees to 2.67 degrees
3) Toe In: 0.33 degrees total toe in or 0.16 inches total toe in
The toe in specification is the exact same as the stock spec, and is independently adjusted by the tie rods. No issues at all here. Any shop should get this 100% perfectly.
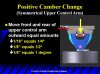
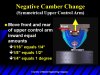
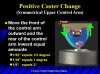
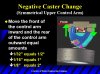
To note the differences in camber and caster, understand how they are adjusted. Each UCA mount has a slot with an eccentric/offset bolt and washers. These are adjusted to move the mounting pivots forward or back. Camber and caster are inter-related...they are not independent adjustments. Camber is adjusted by moving each pivot point in and out together. Caster is created by the offset of the UCA pivots from the front to back bolt.
If you are comparing the stock specs to the lifted specs, the main difference is we like to specify zero degrees of camber for a lifted truck with bigger tires. This may be ideal for having maximum contact patch on the ground and even tire wear on wide tires, but going below the camber specification also reduces the amount of caster you can achieve due to the limitations of the bolt positions. This is why we specify maximum caster: we are prioritizing zero camber, and going with as much caster as we can...knowing it will be lower than the actual specification. Caster will impact tracking and stability...but you can reduce it some with minimal impact. It is a balancing act, and not everyone understands the mechanics of the suspension well enough to follow our instructions.
If you want to align your truck to the factory specification, you can get all numbers close to nominal, but you are allowing for the positive camber to get the increased caster. Also, note that the stock specification doesn't specify a difference from left to right. The suggested caster split from left to right will induce a slight pull to the left, which compensates for road crown to keep the truck straight on a road.
Now for my previous alignments. These were all done with 3" lift UCAs from 4x4parts.com and a 1/2" gap between the stock bump stop, but with differing steering components along the way.
First Alignment:
______________ L__ _____R
Camber _______-.3 ____0.2
Caster ________1.1_____ 1.3
Toe In ____ _______.33
Here you can see they didn't really do a great job of the camber. Left side was negative camber while right side was positive. They did get the right side caster higher than the left, and the total toe in is pretty straight forward. It drove OK, but the low caster numbers made it feel VERY tight in turns (parking lots, U-turns, etc). The reduced caster makes the tires turn pretty sharp...the best way to describe it is that it feels like it doesn't really roll through a tight turn, but like you think your tire may just flop over in a turn and break something because it seems almost perpendicular to the road. I did not notice anything as a result of the caster split from left to right. It tracked pretty straight. I just got used to doing 3 point turns in parking spaces and not turning the wheel to full lock.
Second Alignment:
___________L _____R
Camber__ __0.3____ 0.1
Caster _____2.1____ 2.0
Toe In ________0.3
Here is an alignment where everything is "in the green" per the factory spec. The camber is higher than zero, but my caster got up to 2+ degrees. At least the camber is on the low side of specification, though. No real caster split. The positive camber wasn't extremely noticeable visually or by tire wear. This tracked straight, had a very smooth turning motion, and was probably the best driving alignment I had ever had. I didn't have this long enough to evaluate tire wear, but I have to imagine that if it is within the factory spec, it can't be that bad in the long run.
Third Alignment:
____________L______ R
Camber_____ -0.1 _____.1
Caster______ 1.2_____ 1.3
Toe In: ________0.31
This is the "best" alignment I got per the lifted alignment specification. The camber was very close to zero (they kept flickering between 0, and +/- 0.1). As expected, to lock in that zero camber, the caster was sacrificed. No real caster split left to right, but I never found it too necessary from previous alignments (and per FSM). Toe in is normal. This drives OK. The camber visually is dead set at zero. It still has the low caster tight turn feel, and it gets a little darty on the highway. I could definitely tell a difference between 1.2 degrees caster and 2.1.
Fourth Alignment
_________L______R
Camber: -0.1_____0.0
Caster: __3.3_____3.1
Toe:_____0.16____0.17
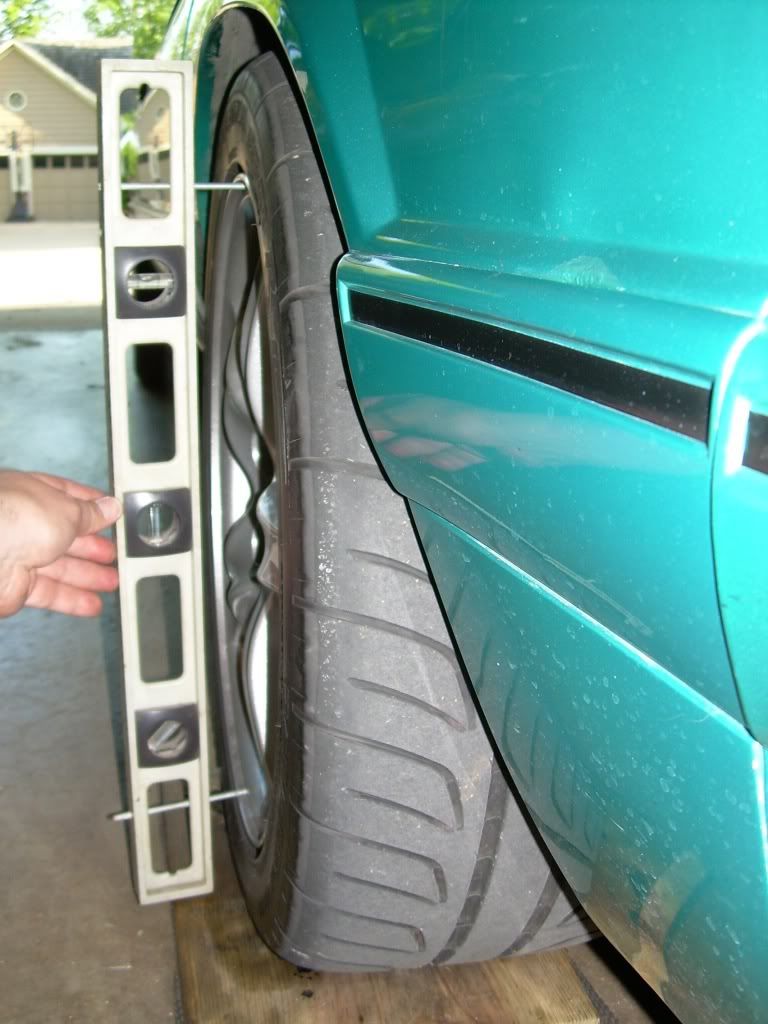
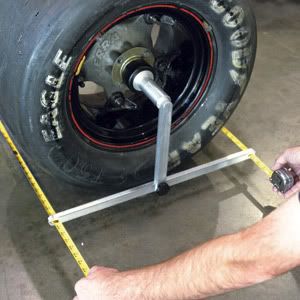
I did this alignment by fabricating my own camber gauge and adjusting the control arm locations myself (see page 3 of this thread) to the maximum caster position. I started with the maximum amount of caster (rear UCA mount max inwards, front UCA mount max outwards), and measured the camber and made slight adjustments to get to zero. I went to Firestone to get a toe-in alignment only. My camber gauge did great.
What I more importantly found out is that I had a LOT of room left for adjusting caster all this time, but more than a half dozen technicians at different shops couldn't get it figured out. With these results, I could reduce caster while keeping camber zero to have Caster/Toe at factory spec with camber zero. I could also adjust to negative camber, and still have factory specified caster.
All in all...the major take away here is the camber vs. caster competition as they are not independent adjustments. This confuses many technicians and makes it difficult to get the "lifted" specs done correctly. The lifted alignment specs calls for zero camber and to sacrifice caster if necessary. The stock specs call for positive camber and a lot of caster. With a lifted truck, this becomes a balancing act between maximum stability and tracking vs. maximum contact patch and wear protection of $1000+ worth of tires. Take these comments and make yourself more informed next time you have to get an alignment.
The very first thing: don't bother getting an alignment if you don't put the money up front to get the proper kits and parts to keep your alignment reliable. This means not only UCAs, but also idler arm braces, center links, idler arm bushings, UCA bushings, etc. Especially with larger tires, a non-reinforced steering system won't be able to hold your tires in place reliably. The numbers will look great off the alignment rack, but they will quickly drift after you drive out of the parking lot. In my experience, the stock style center link was the major issue to a reliable alignment. Don't forget to observe the 1/2" gap at the stock bump stop for a better alignment.
Moving on, let's review the commonly accepted alignment specs for a lifted Xterra, and compare them to the stock alignment specs.
Lifted Alignment:
1) Camber: 0 degrees or as close as possible
2) Caster: Maximum caster on passenger side while maintaining zero camber. Adjust driver side caster to be slightly less while maintaining zero camber.
3) Toe In: 0.33 degrees or 0.16 inches of total toe in.
Stock Alignment:
1) Camber: 0.1 degree to 1.1 degree
2) Caster: 1.67 degrees to 2.67 degrees
3) Toe In: 0.33 degrees total toe in or 0.16 inches total toe in
The toe in specification is the exact same as the stock spec, and is independently adjusted by the tie rods. No issues at all here. Any shop should get this 100% perfectly.
To note the differences in camber and caster, understand how they are adjusted. Each UCA mount has a slot with an eccentric/offset bolt and washers. These are adjusted to move the mounting pivots forward or back. Camber and caster are inter-related...they are not independent adjustments. Camber is adjusted by moving each pivot point in and out together. Caster is created by the offset of the UCA pivots from the front to back bolt.
If you are comparing the stock specs to the lifted specs, the main difference is we like to specify zero degrees of camber for a lifted truck with bigger tires. This may be ideal for having maximum contact patch on the ground and even tire wear on wide tires, but going below the camber specification also reduces the amount of caster you can achieve due to the limitations of the bolt positions. This is why we specify maximum caster: we are prioritizing zero camber, and going with as much caster as we can...knowing it will be lower than the actual specification. Caster will impact tracking and stability...but you can reduce it some with minimal impact. It is a balancing act, and not everyone understands the mechanics of the suspension well enough to follow our instructions.
If you want to align your truck to the factory specification, you can get all numbers close to nominal, but you are allowing for the positive camber to get the increased caster. Also, note that the stock specification doesn't specify a difference from left to right. The suggested caster split from left to right will induce a slight pull to the left, which compensates for road crown to keep the truck straight on a road.
Now for my previous alignments. These were all done with 3" lift UCAs from 4x4parts.com and a 1/2" gap between the stock bump stop, but with differing steering components along the way.
First Alignment:
______________ L__ _____R
Camber _______-.3 ____0.2
Caster ________1.1_____ 1.3
Toe In ____ _______.33
Here you can see they didn't really do a great job of the camber. Left side was negative camber while right side was positive. They did get the right side caster higher than the left, and the total toe in is pretty straight forward. It drove OK, but the low caster numbers made it feel VERY tight in turns (parking lots, U-turns, etc). The reduced caster makes the tires turn pretty sharp...the best way to describe it is that it feels like it doesn't really roll through a tight turn, but like you think your tire may just flop over in a turn and break something because it seems almost perpendicular to the road. I did not notice anything as a result of the caster split from left to right. It tracked pretty straight. I just got used to doing 3 point turns in parking spaces and not turning the wheel to full lock.
Second Alignment:
___________L _____R
Camber__ __0.3____ 0.1
Caster _____2.1____ 2.0
Toe In ________0.3
Here is an alignment where everything is "in the green" per the factory spec. The camber is higher than zero, but my caster got up to 2+ degrees. At least the camber is on the low side of specification, though. No real caster split. The positive camber wasn't extremely noticeable visually or by tire wear. This tracked straight, had a very smooth turning motion, and was probably the best driving alignment I had ever had. I didn't have this long enough to evaluate tire wear, but I have to imagine that if it is within the factory spec, it can't be that bad in the long run.
Third Alignment:
____________L______ R
Camber_____ -0.1 _____.1
Caster______ 1.2_____ 1.3
Toe In: ________0.31
This is the "best" alignment I got per the lifted alignment specification. The camber was very close to zero (they kept flickering between 0, and +/- 0.1). As expected, to lock in that zero camber, the caster was sacrificed. No real caster split left to right, but I never found it too necessary from previous alignments (and per FSM). Toe in is normal. This drives OK. The camber visually is dead set at zero. It still has the low caster tight turn feel, and it gets a little darty on the highway. I could definitely tell a difference between 1.2 degrees caster and 2.1.
Fourth Alignment
_________L______R
Camber: -0.1_____0.0
Caster: __3.3_____3.1
Toe:_____0.16____0.17
I did this alignment by fabricating my own camber gauge and adjusting the control arm locations myself (see page 3 of this thread) to the maximum caster position. I started with the maximum amount of caster (rear UCA mount max inwards, front UCA mount max outwards), and measured the camber and made slight adjustments to get to zero. I went to Firestone to get a toe-in alignment only. My camber gauge did great.
What I more importantly found out is that I had a LOT of room left for adjusting caster all this time, but more than a half dozen technicians at different shops couldn't get it figured out. With these results, I could reduce caster while keeping camber zero to have Caster/Toe at factory spec with camber zero. I could also adjust to negative camber, and still have factory specified caster.
All in all...the major take away here is the camber vs. caster competition as they are not independent adjustments. This confuses many technicians and makes it difficult to get the "lifted" specs done correctly. The lifted alignment specs calls for zero camber and to sacrifice caster if necessary. The stock specs call for positive camber and a lot of caster. With a lifted truck, this becomes a balancing act between maximum stability and tracking vs. maximum contact patch and wear protection of $1000+ worth of tires. Take these comments and make yourself more informed next time you have to get an alignment.
Last edited:
 and I have the AC 3" lift