
So I decided to put by 6.8 build on the back burner for the time being as I collect parts, but I did decide to go ahead and build my KISS rifle. I decided to make a crude How To on how to piece the lower receiver together. I hope this helps someone or gets someone interested since this is way easy. Sorry for the crappy picture angles at times -- I needed a camera man.
I did this using nothing more than a flat head screwdriver and a adjustable wrench. I usually use Robogrips but the pair I usually use decided they wanted nothing more to do with me and walked out of my life. Ideally you're supposed to use a brass drift and some punches, but I wanted to show that you don't need anything special to do this.
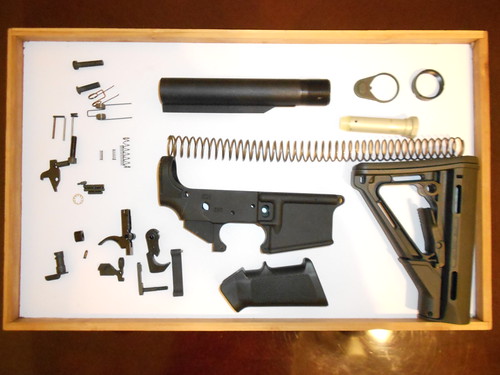
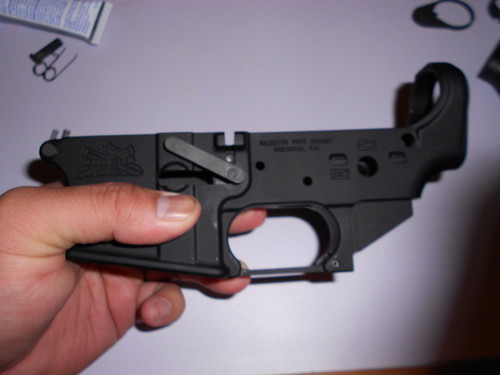
First things first, this is everything you'll need to build your very own AR lower receiver. Don't be put off by all the smart parts, there really isn't that many and it's way easier than it looks.
Here's a better pic of the lower parts kit and each part labeled.

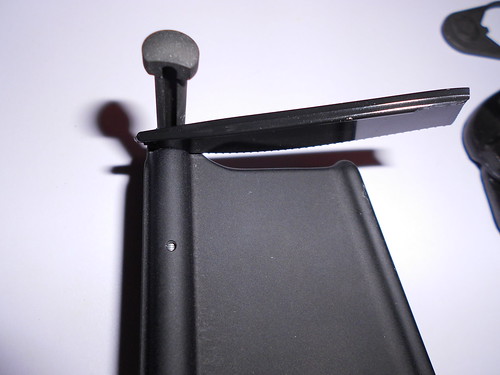
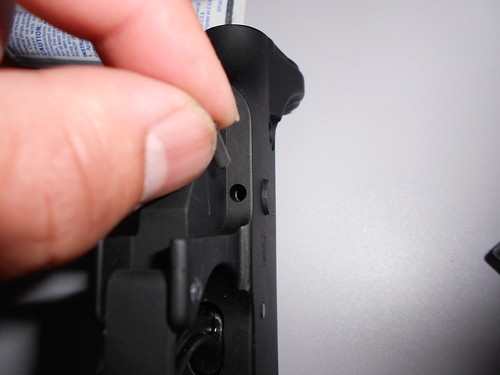
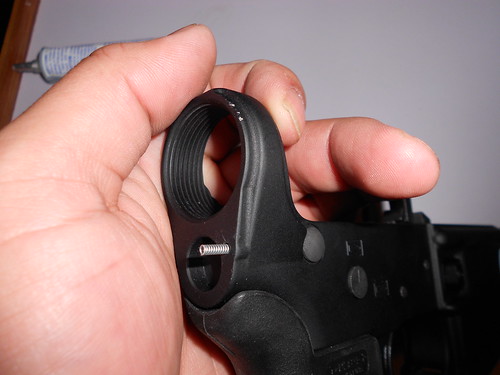
I always do the hardest part first, and to me that is installing the front take down pin. It's not even that it's hard, it's just tedious. A lot of people tend to shoot parts across the room on this one. Best way is to install the spring and detent and then use a thin object to push down down as you slide in the front take down pin. A razor works nice, but I used a piece of a plastic knife because that was the first thing I saw.
Next I installed the trigger guard.
Be careful if you're using pliers/wrench. I've seen people break off one of the ears off the lower. Use gentle force and apply lube if need be -- I just used some white lithium grease I had lying around to ease things a bit.

Next up I install the magazine release. Slide the magazine catch through the appropriate hole on the lower receiver and then flip it over to install the magazine catch spring.
Start the magazine catch button a few threads and until it lines up with the hole.

As you push pretty hard on the magazine release button, flip over the receiver and use the magazine catch to thread it the rest of the way into the button.
Just thread the magazine catch enough through the button to where it barely protrudes out.
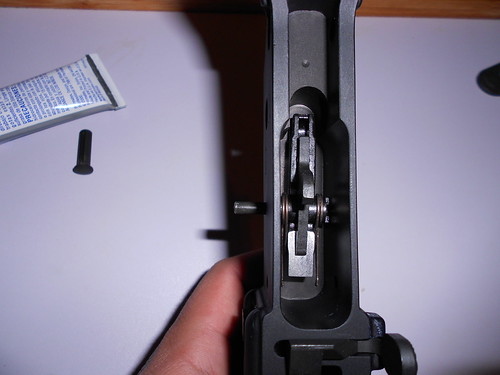
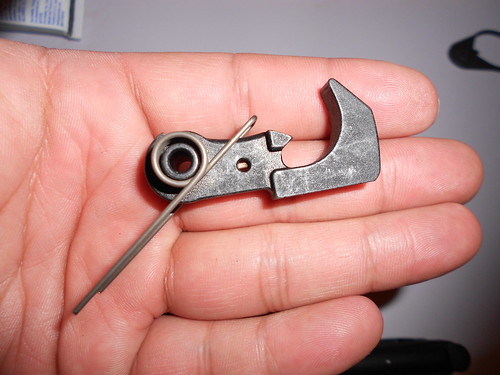
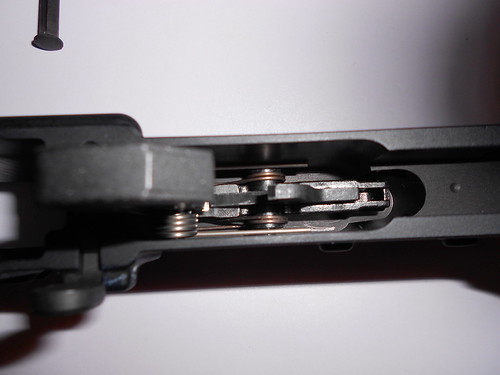
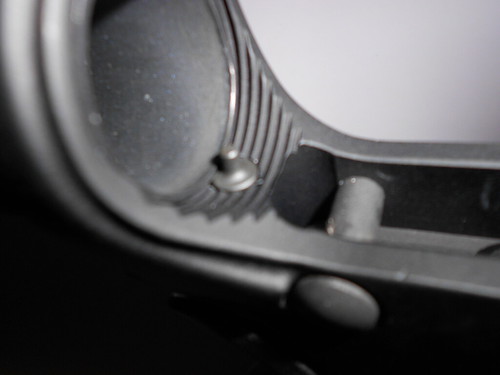
Next I install the bolt catch. Start by inserting the proper spring and the buffer into the corresponding hole.
Insert the pin and again, use gentle force to press the pin all the way through.

Still with me? See it's not too hard!
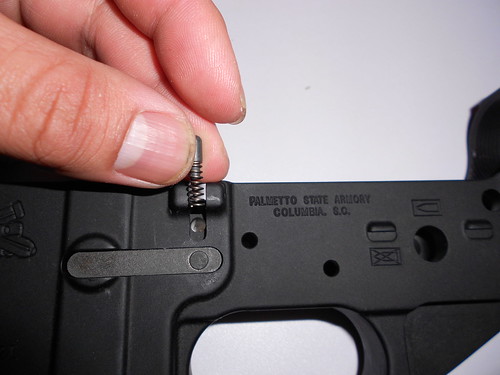
Place the trigger and disconnect springs in place as shown.
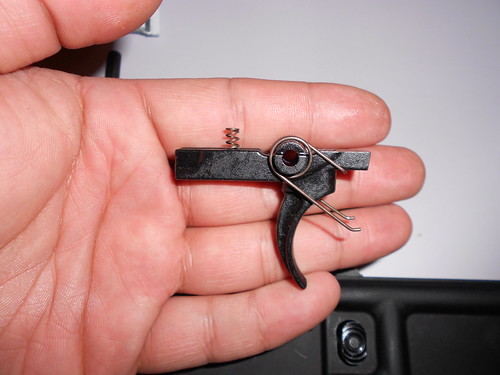
Drop the disconnector on to the trigger assembly.

Place the trigger assembly into the receiver and use a trigger pin to hold it in place. You will need to wiggle the trigger assembly around a bit to get the pin to line up with the holes correctly. A little love tap will set it in nicely.
Next, install the hammer spring onto the hammer as so.
Place the hammer into the receiver making sure the legs of the spring sit on TOP of the trigger -- the legs of the spring should be facing backwards. Install the hammer pin like you installed the trigger pin.
Now its time to install the selector (safety) switch AND the pistol grip. You have to install both as the detent and spring that hold in the selector is held in by the grip itself.
Drop the selector in.
While making sure the selector stays in, drop in the selector detent into the home on the bottom of the receiver.
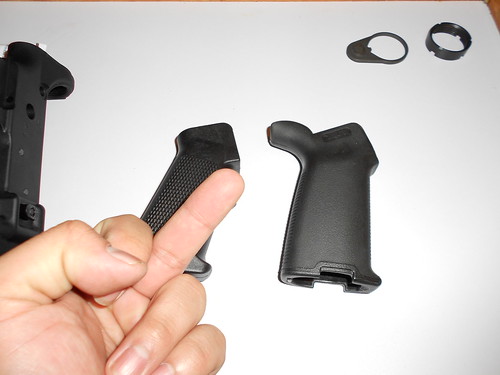
The spring itself goes into the grip. 99% of the lower parts kits on the market come with a mil-spec USGI grip. While functional able, it's not very ergonomic. So I opted for the Magpul MOE+ grip -- it's made from over molded rubber and is so much nice. USGI on left and Magpul on right.
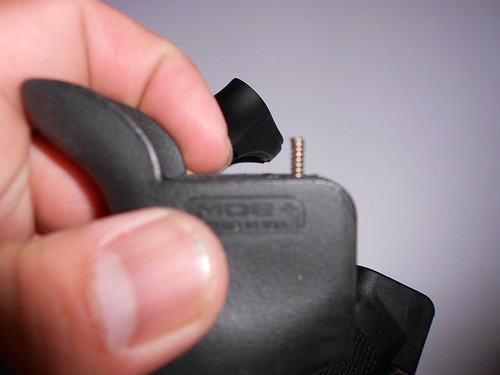
Slip the selector spring into the grip and then install it. Just bolt it in using the supplied bolt from Magpul.
Now is the time to mess with the fire control group! Molest the living hell out of your hammer, trigger, and selector. Make sure that after you pull the trigger (do not let the hammer hit the bolt catch) that when you lock it back while the trigger is still pressed, it stays locked! If it doesn't, disassemble it immediately. You do not want an unregistered automatic weapon -- it can happen. Also make sure that the hammer does not get released when the selector is on safe. THIS IS YOUR CHANCE TO MAKE SURE EVERYTHING IS WORKING PROPERLY AND SAFELY!
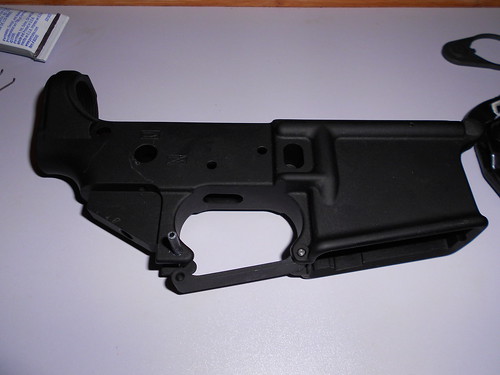
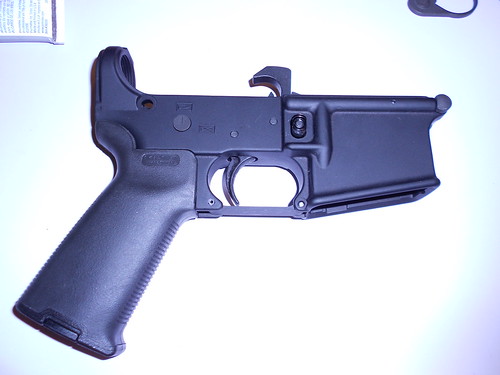
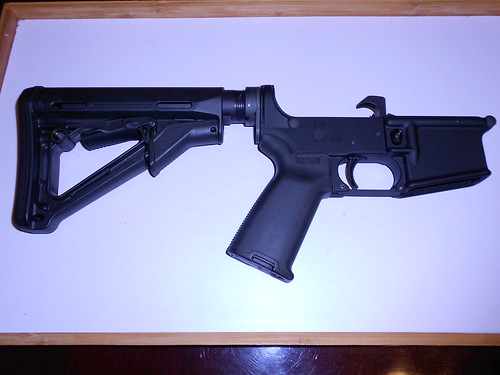
By now your lower should look like this. ALMOST DONE!
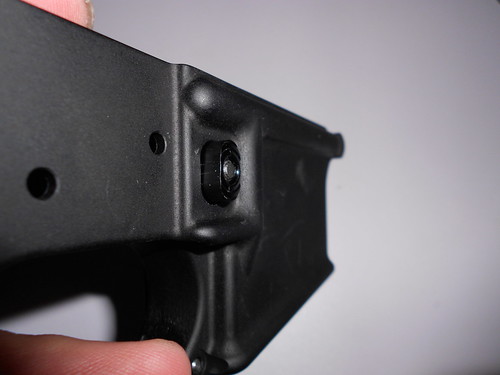
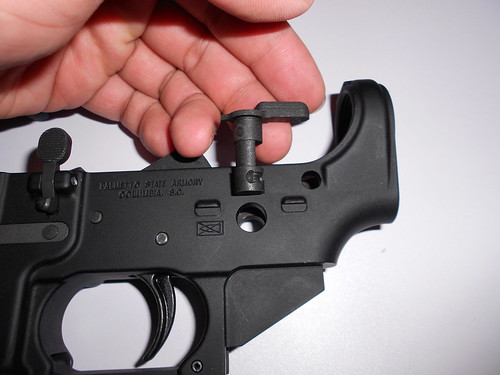
Next up, the rear take down pin.

The rear take down pin is held in by the butt plate that is attached to the buffer tube. Drop the detent in and then the spring. Some people use a capture screw here, but it's really not necessary.
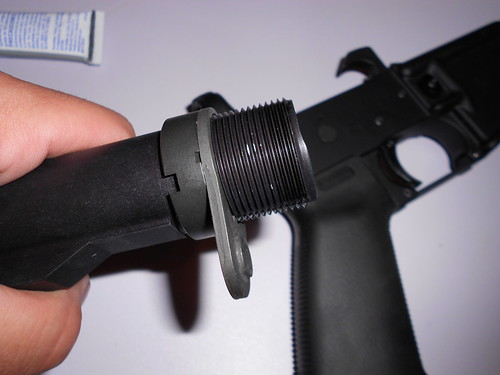
Install the castle nut and plate onto the buffer tube. Then thread the buffer tube into the receiver. Do not go all the way in!
The reason you don't want to thread it completely is because you have to drop in the buffer retainer spring and the buffer retainer.
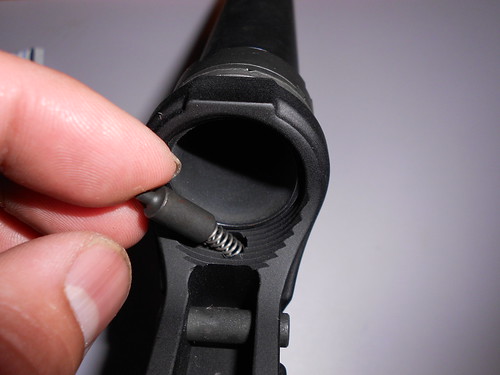
Once those are in, now you can finish threading in the buffer tube. But only thread it in enough to wear the tube holds in the buffer retainer, but does NOT touch the nipple itself.

Now slide on whatever butt stock you chose, I decided on a Magpul CTR for this build, place buffer spring and buffer into the tube, and you're done! You have just finished building your first AR lower receiver.
Now either slap on a pre-built upper or build your own and you're in business! See it wasn't too hard at all. Total time for me is usually around 15 minutes. You don't have to follow this exact order but after you build one, you get the gist of it.
NOW GO SHOOT!
I did this using nothing more than a flat head screwdriver and a adjustable wrench. I usually use Robogrips but the pair I usually use decided they wanted nothing more to do with me and walked out of my life. Ideally you're supposed to use a brass drift and some punches, but I wanted to show that you don't need anything special to do this.
First things first, this is everything you'll need to build your very own AR lower receiver. Don't be put off by all the smart parts, there really isn't that many and it's way easier than it looks.
Here's a better pic of the lower parts kit and each part labeled.
I always do the hardest part first, and to me that is installing the front take down pin. It's not even that it's hard, it's just tedious. A lot of people tend to shoot parts across the room on this one. Best way is to install the spring and detent and then use a thin object to push down down as you slide in the front take down pin. A razor works nice, but I used a piece of a plastic knife because that was the first thing I saw.
Next I installed the trigger guard.
Be careful if you're using pliers/wrench. I've seen people break off one of the ears off the lower. Use gentle force and apply lube if need be -- I just used some white lithium grease I had lying around to ease things a bit.
Next up I install the magazine release. Slide the magazine catch through the appropriate hole on the lower receiver and then flip it over to install the magazine catch spring.
Start the magazine catch button a few threads and until it lines up with the hole.
As you push pretty hard on the magazine release button, flip over the receiver and use the magazine catch to thread it the rest of the way into the button.
Just thread the magazine catch enough through the button to where it barely protrudes out.
Next I install the bolt catch. Start by inserting the proper spring and the buffer into the corresponding hole.
Insert the pin and again, use gentle force to press the pin all the way through.
Still with me? See it's not too hard!
Place the trigger and disconnect springs in place as shown.
Drop the disconnector on to the trigger assembly.
Place the trigger assembly into the receiver and use a trigger pin to hold it in place. You will need to wiggle the trigger assembly around a bit to get the pin to line up with the holes correctly. A little love tap will set it in nicely.
Next, install the hammer spring onto the hammer as so.
Place the hammer into the receiver making sure the legs of the spring sit on TOP of the trigger -- the legs of the spring should be facing backwards. Install the hammer pin like you installed the trigger pin.
Now its time to install the selector (safety) switch AND the pistol grip. You have to install both as the detent and spring that hold in the selector is held in by the grip itself.
Drop the selector in.
While making sure the selector stays in, drop in the selector detent into the home on the bottom of the receiver.
The spring itself goes into the grip. 99% of the lower parts kits on the market come with a mil-spec USGI grip. While functional able, it's not very ergonomic. So I opted for the Magpul MOE+ grip -- it's made from over molded rubber and is so much nice. USGI on left and Magpul on right.
Slip the selector spring into the grip and then install it. Just bolt it in using the supplied bolt from Magpul.
Now is the time to mess with the fire control group! Molest the living hell out of your hammer, trigger, and selector. Make sure that after you pull the trigger (do not let the hammer hit the bolt catch) that when you lock it back while the trigger is still pressed, it stays locked! If it doesn't, disassemble it immediately. You do not want an unregistered automatic weapon -- it can happen. Also make sure that the hammer does not get released when the selector is on safe. THIS IS YOUR CHANCE TO MAKE SURE EVERYTHING IS WORKING PROPERLY AND SAFELY!
By now your lower should look like this. ALMOST DONE!
Next up, the rear take down pin.
The rear take down pin is held in by the butt plate that is attached to the buffer tube. Drop the detent in and then the spring. Some people use a capture screw here, but it's really not necessary.
Install the castle nut and plate onto the buffer tube. Then thread the buffer tube into the receiver. Do not go all the way in!
The reason you don't want to thread it completely is because you have to drop in the buffer retainer spring and the buffer retainer.
Once those are in, now you can finish threading in the buffer tube. But only thread it in enough to wear the tube holds in the buffer retainer, but does NOT touch the nipple itself.
Now slide on whatever butt stock you chose, I decided on a Magpul CTR for this build, place buffer spring and buffer into the tube, and you're done! You have just finished building your first AR lower receiver.
Now either slap on a pre-built upper or build your own and you're in business! See it wasn't too hard at all. Total time for me is usually around 15 minutes. You don't have to follow this exact order but after you build one, you get the gist of it.
NOW GO SHOOT!
Last edited:

")
