Hi all,
Well, after owning the X for about 6 months, it has been both enjoyable and a little of a pain.
Last month arriving at the doctor's office for a morning appointment, got out and noticed a strong odor of hot coolant. Was thinking it might have been one of the other vehicles in the parking lot. But, no, it was me. Strange thing is, according to the records that came with the X when I bought it, the hoses and radiator was replaced about 1 year before I bought it. It was a Calsonic-Kansei brand and it did look newish. Not sure if it was a defective part or maybe was damaged during shipping/installation...but it seems the crimps on the top tank were not fully seated. So, that was fun...it seems like everywire hardness and hose was 'attached' to the fan shroud.
In the last 6 months or so, I did some minor mods and add ons (accessories) to the X...as you can see in the photos...sorry for the dirt...took these photos soon after coming back from Prentice Cooper State Park here in East Tennessee.
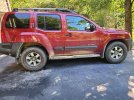
As you can see, I've added some off road lights to the front. Not sure what brand these are, but got them for $5 at a local bin store. They didn't come with any brackets so improvised with some 'L' brackets from the local hardware store.
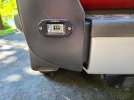
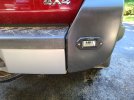
Also installed some auxiliary backup lights...got these from the local Walmart on clearance...$20 for a the pair, I think. They are flush mounted. I had to decide on whether to cut holes in the metal cover of the rear bumper or the plastic bumper corners. Since I can't cut paper straight with a pair of scissors, I decided on the plastic ends...I believe it would be easier to correct or replace if I screw up. With cardboard template, a utility razor knife (big and small) and a drill...made it work. Oh, I had originally wanted to tie these lights to the reverse light wire on the stock 7 pin trailer hardness, but found out that the previous owner had (or had someone) 'hacked' in a 4pin hardness into the 7 pin hardness...using cheap skotchlok type connectors to splice the 4pin hardness into the 7pin hardness...RIGHT at the pigtail connector on the frame. What a frickin mess...one wire was already broke and the others had green crusties. I remove the 4pin hardness and best I could, repair the 7pin hardness with some extra wire and soldering...not the best repair, but so far it works. The pig tail connector itself needs to be replaced. Anyway, ended up just splicing each light into the respective reverse lights wiring.
In the photos, you'll notice the step bars...yeah...they are for the wife and kid...so they can get in and out more easily. Got these at the local pick n' pull yard. One good thing about them...they seem to make good mud blockers. When going through mud/muck, they seem to take the brunt of the up splash. We had our windows down and not once did any up splash come into the passenger area.
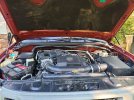
The picture of the engine bay...did the hood strut mod and eliminated the prop rod. Got the kit from Z1.
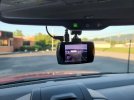
Lastly, install a dual view dash cam with a hard mount on the rear view mirror and also with power hardwired to the overhead lights. This way, the camera will shutoff when the BCM cuts power to the overhead console lights and will come back on when the door is open. Nothing special about this camera as it is a cheap Walmart clearance special, but it does come with a rear mounted camera...so you can view in real time the rear and have it as a back up camera. It does NOT provide the best view or resolution, but it does allow you to see if anything is immediately behind you.
So, I'm hoping to save up for a lift as my next mod...it all depends on what curve ball life might be throwing my way...
Well, after owning the X for about 6 months, it has been both enjoyable and a little of a pain.
Last month arriving at the doctor's office for a morning appointment, got out and noticed a strong odor of hot coolant. Was thinking it might have been one of the other vehicles in the parking lot. But, no, it was me. Strange thing is, according to the records that came with the X when I bought it, the hoses and radiator was replaced about 1 year before I bought it. It was a Calsonic-Kansei brand and it did look newish. Not sure if it was a defective part or maybe was damaged during shipping/installation...but it seems the crimps on the top tank were not fully seated. So, that was fun...it seems like everywire hardness and hose was 'attached' to the fan shroud.
In the last 6 months or so, I did some minor mods and add ons (accessories) to the X...as you can see in the photos...sorry for the dirt...took these photos soon after coming back from Prentice Cooper State Park here in East Tennessee.
As you can see, I've added some off road lights to the front. Not sure what brand these are, but got them for $5 at a local bin store. They didn't come with any brackets so improvised with some 'L' brackets from the local hardware store.
Also installed some auxiliary backup lights...got these from the local Walmart on clearance...$20 for a the pair, I think. They are flush mounted. I had to decide on whether to cut holes in the metal cover of the rear bumper or the plastic bumper corners. Since I can't cut paper straight with a pair of scissors, I decided on the plastic ends...I believe it would be easier to correct or replace if I screw up. With cardboard template, a utility razor knife (big and small) and a drill...made it work. Oh, I had originally wanted to tie these lights to the reverse light wire on the stock 7 pin trailer hardness, but found out that the previous owner had (or had someone) 'hacked' in a 4pin hardness into the 7 pin hardness...using cheap skotchlok type connectors to splice the 4pin hardness into the 7pin hardness...RIGHT at the pigtail connector on the frame. What a frickin mess...one wire was already broke and the others had green crusties. I remove the 4pin hardness and best I could, repair the 7pin hardness with some extra wire and soldering...not the best repair, but so far it works. The pig tail connector itself needs to be replaced. Anyway, ended up just splicing each light into the respective reverse lights wiring.
In the photos, you'll notice the step bars...yeah...they are for the wife and kid...so they can get in and out more easily. Got these at the local pick n' pull yard. One good thing about them...they seem to make good mud blockers. When going through mud/muck, they seem to take the brunt of the up splash. We had our windows down and not once did any up splash come into the passenger area.
The picture of the engine bay...did the hood strut mod and eliminated the prop rod. Got the kit from Z1.
Lastly, install a dual view dash cam with a hard mount on the rear view mirror and also with power hardwired to the overhead lights. This way, the camera will shutoff when the BCM cuts power to the overhead console lights and will come back on when the door is open. Nothing special about this camera as it is a cheap Walmart clearance special, but it does come with a rear mounted camera...so you can view in real time the rear and have it as a back up camera. It does NOT provide the best view or resolution, but it does allow you to see if anything is immediately behind you.
So, I'm hoping to save up for a lift as my next mod...it all depends on what curve ball life might be throwing my way...