
caseycamby
Suspension Lift
- Location
- Marion, NC
I don't think this has been covered but I had to do mine and figured I'd make a little how to to maybe help somebody else.
I went into this completely blind. Until today, I've never even fully removed the door panel so today was a good learning experience haha
Tools for install:
Flathead screwdriver (helps with popping door panel clips off)
2 Screwdrivers (one normal sized one and a large one for the screws that hold the window motor to the regulator on)
Ratchet and 10mm (I'm pretty sure every bolt you're going to remove is a 10mm)
Extension (to get to one of the bolts that holds the window to the regulator)
Tips for install:
Be sure to keep track off the screws/bolts you take off and know which ones go where.
First, remove the panel of the door you're working on. I was installing the one on my driver side door. However, I'm sure it's the same thing for the other doors as well.
I've marked in red, the screws necessary for the removal of the panel. Once these three screws are out, you can begin popping the panel off.
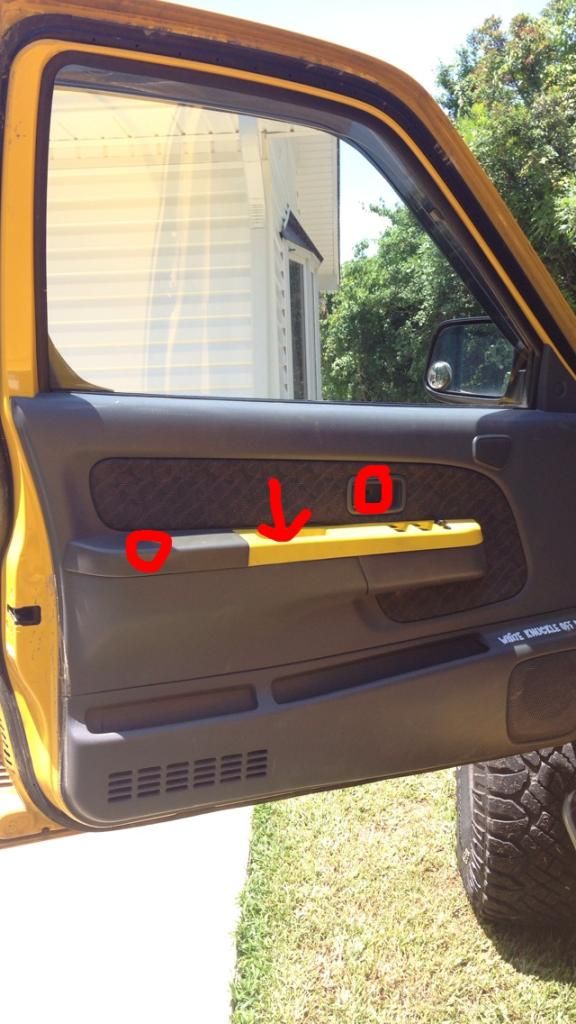
To get to the screw on the far left, pop the little cushion out. Just get your fingers underneath it and pull up and it will pop right out. Once the cushion is out, the screw will be exposed. Next, remove the screw in the door handle/change holder. Once it's removed, do the same thing to this piece. Just lift up and it will pop right out as well. For the screw on the far right, it is accessible without removing anything.
You are now ready to start popping the door panel off. I started from the bottom left corner. Once you get one clip off, just run your hand underneath the panel. You'll start to feel it getting closer to the door, that's where another clip is. Once you get up to the top right corner, the little triangle piece is held together with another clip. It will probably fly off and go in the grass and you'll spend 5 minutes searching for it. Once you find it, store it in a safe place.
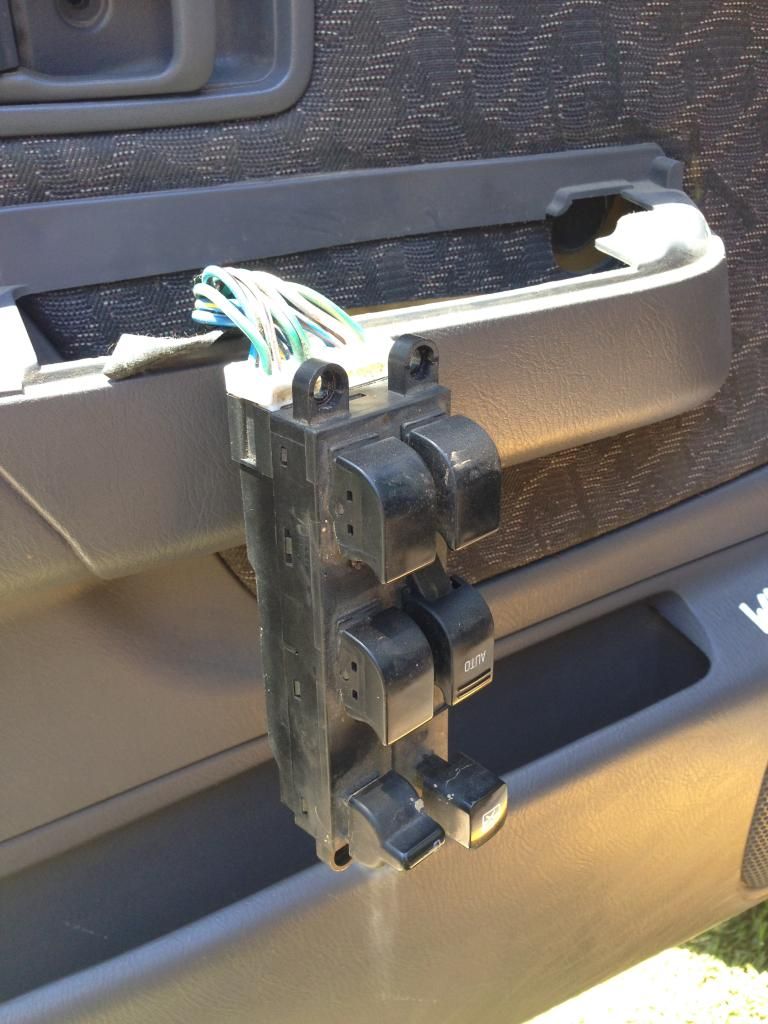
Now, once all the clips are removed, you still won't be able to fully remove the panel. There's one last step. But before you do that step, go ahead and remove the window and door lock controls. It's held on by one of Satan's creations. After 15 minutes of cussing, remove the wire connector from the controls, and set it aside.
Finally, remove the panel. Make SURE you have all the clips removed. Once they're removed, grab the panel from the side and pull up and toward yourself. It should pop right out. Set it aside. And it should be looking like this.
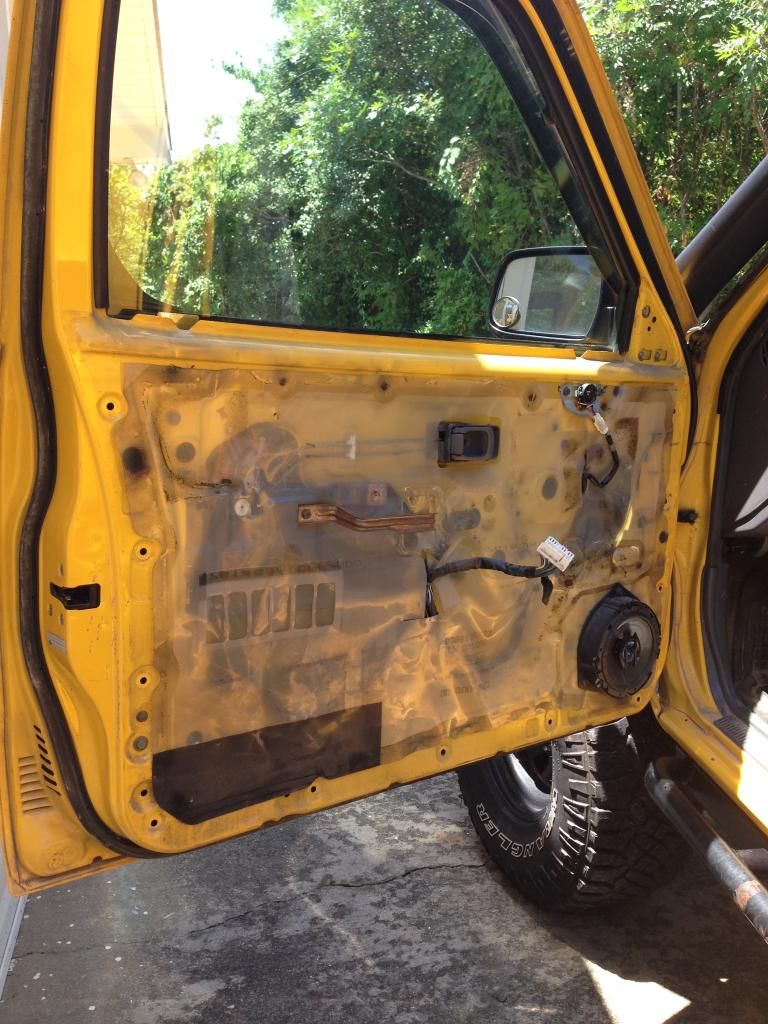
Next, remove the metal "door handle". It's held on by two bolts. Once that is out of the way, remove the plastic and expose the guts of your door. My phone started overheating and I forgot to snap a picture but you also need to remove the black metal piece that covers up the big hole in your door. Once all of that is out of the way, it should look like this..
Next step, you can temporarily plug Satan's connector in (not all the way, just enough to make a connection) and roll down the window until the bottom of it is accessible.
Next, I went ahead and marked the things you're going to need to remove to get the regulator/motor out. Bolts in red and the wire connector in blue (don't worry, this one is easier") ). Once all of this is removed, the regulator and motor are free from the door but are still connected to the window.
). Once all of this is removed, the regulator and motor are free from the door but are still connected to the window.
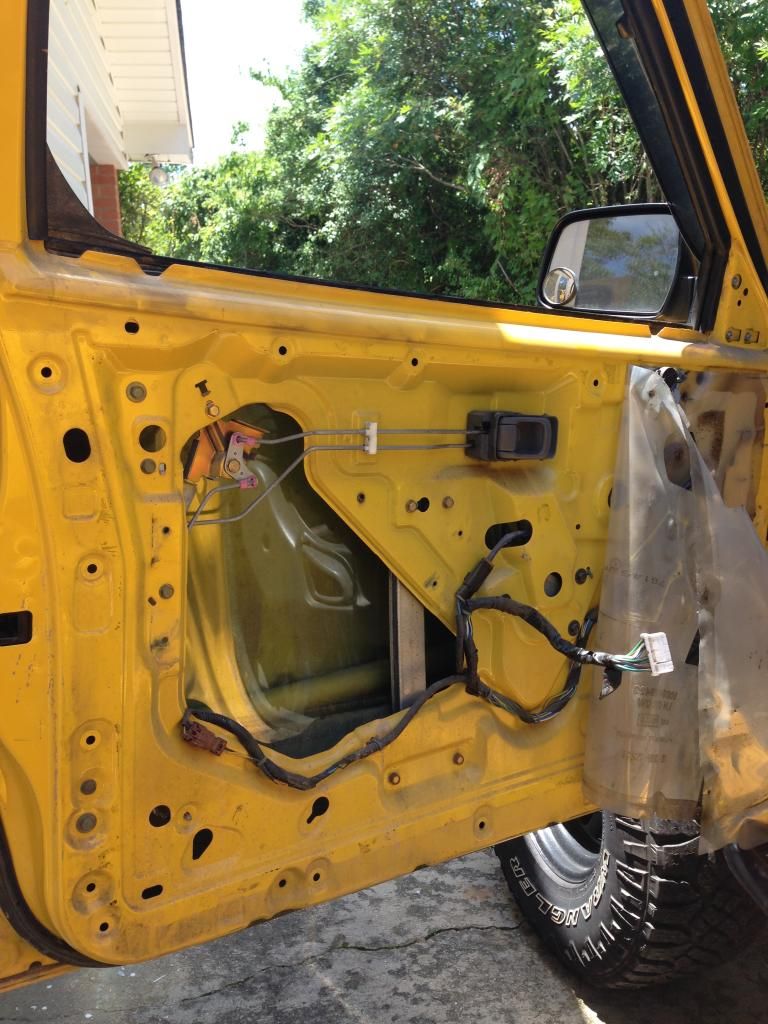
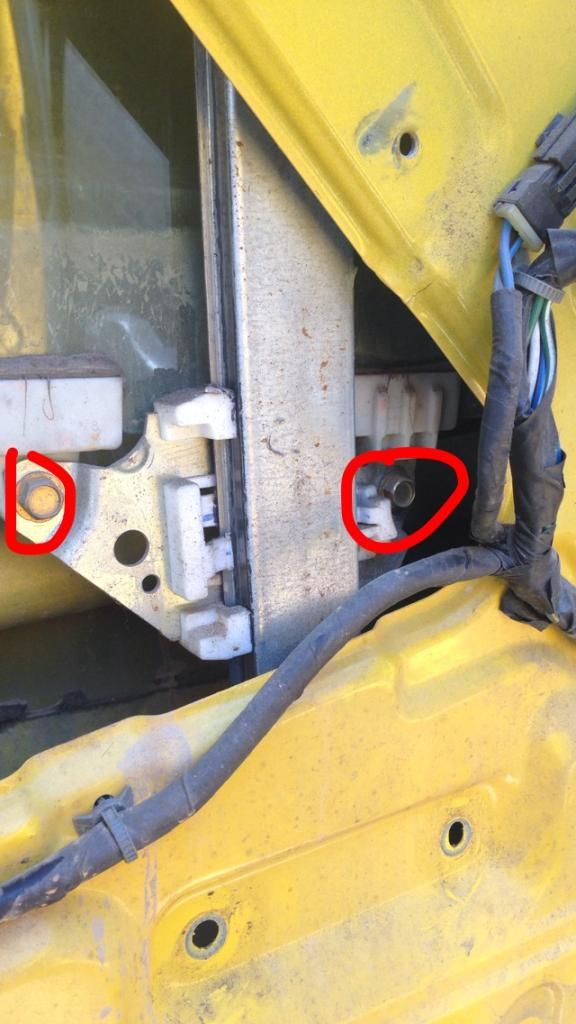
Next, remove these last two bolts and the regulator and motor are free. Just be sure to hold the window while you unbolt the two bolts. You may need an extension for the bolt closest to the interior of your X.
Once the bolts are out, be careful and wiggle the regulator and motor out of the hole, still holding on the window. You need to be careful here so you don't scratch the window while getting the regulator and motor out. Once it is out, carefully let the window down. You should now have the regulator and motor out and your replacement ready to swap.
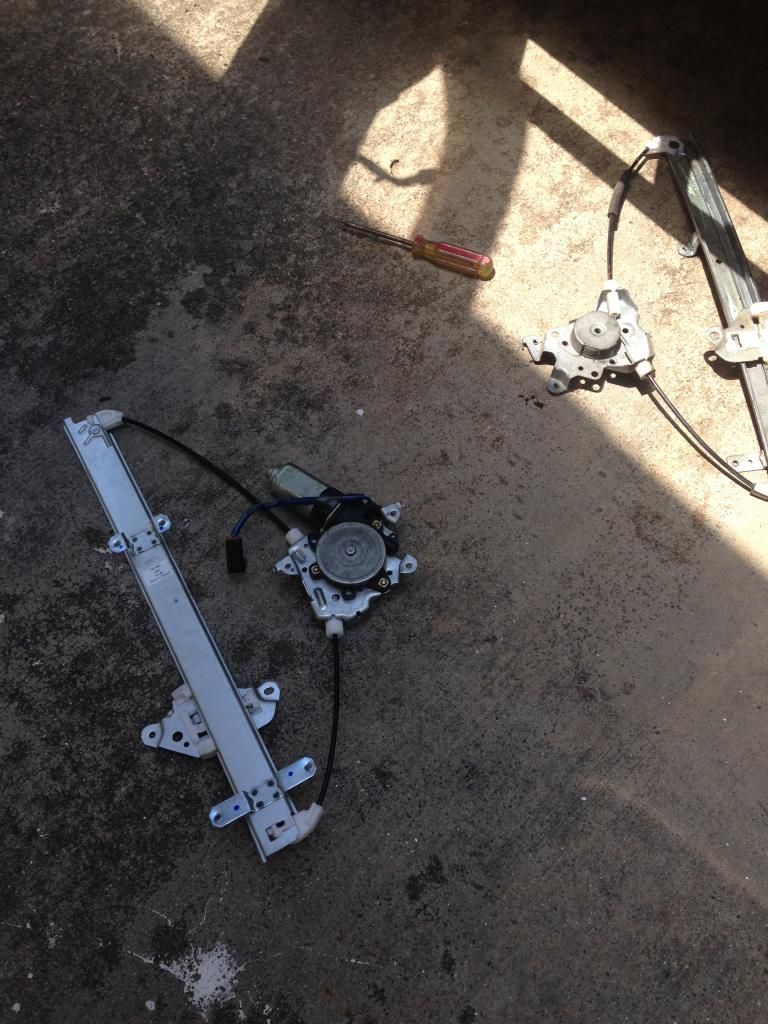
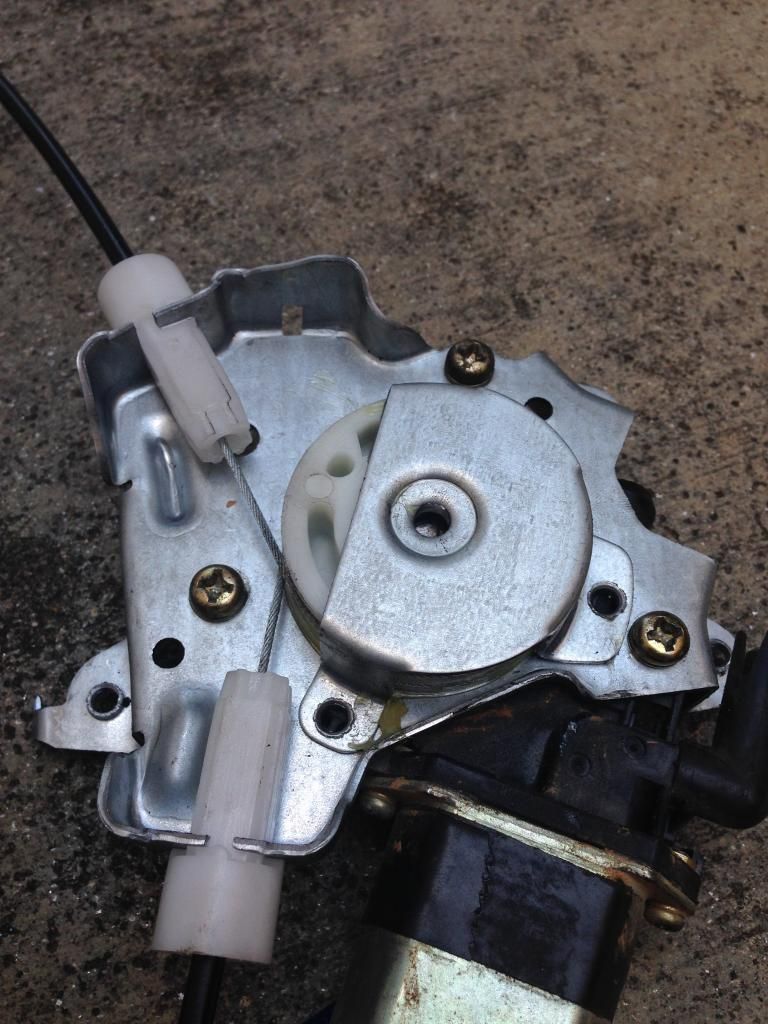
Now, I'm just replacing my regulator, not the motor. If you're replacing both you can skip this step because I'm pretty sure they come together. If you are JUST replacing the regulator like I am, or the regulator and motor come separately, this is what you need to do.
There are three screws that hold the motor to the regulator. Undo those screws from the old regulator and toss it aside. Get your new regulator and align the motor correctly and screw it up. It's now ready for reinstall!
This next step needs a friend. Carefully slide the window up and have your friend keep up as far as it will go. This can be tedious but it gives you the most room for the reinstallation of the new regulator. Slide the new regulator and motor in the hole and align it up where the old one went. Be sure get the wire for the motor though the small hole before you tighten up the seven bolts.
Once the new regulator and the seven bolts are in and you've connected the wires, give your friend a well needed break. Carefully slide the window down until the holes line up with the new regulator and reinstall those two bolts.
From here, it's reassembly of everything you just took off. Just read this backwards and you're done!! Just be sure to clean your dirty window and you're ready to cruise with the windows down
Stay cool everyone!
I went into this completely blind. Until today, I've never even fully removed the door panel so today was a good learning experience haha
Tools for install:
Flathead screwdriver (helps with popping door panel clips off)
2 Screwdrivers (one normal sized one and a large one for the screws that hold the window motor to the regulator on)
Ratchet and 10mm (I'm pretty sure every bolt you're going to remove is a 10mm)
Extension (to get to one of the bolts that holds the window to the regulator)
Tips for install:
Be sure to keep track off the screws/bolts you take off and know which ones go where.
First, remove the panel of the door you're working on. I was installing the one on my driver side door. However, I'm sure it's the same thing for the other doors as well.
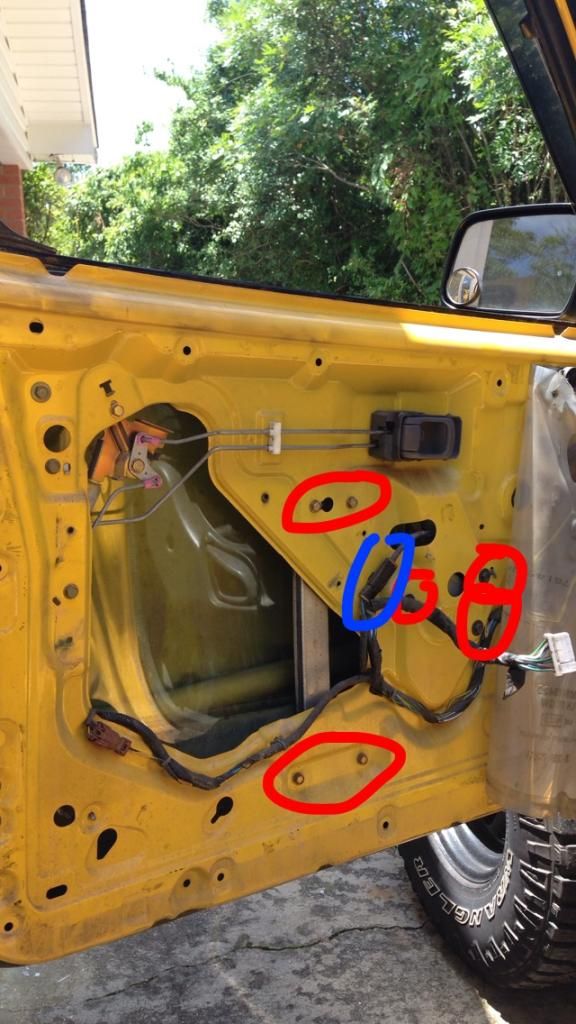
I've marked in red, the screws necessary for the removal of the panel. Once these three screws are out, you can begin popping the panel off.
To get to the screw on the far left, pop the little cushion out. Just get your fingers underneath it and pull up and it will pop right out. Once the cushion is out, the screw will be exposed. Next, remove the screw in the door handle/change holder. Once it's removed, do the same thing to this piece. Just lift up and it will pop right out as well. For the screw on the far right, it is accessible without removing anything.
You are now ready to start popping the door panel off. I started from the bottom left corner. Once you get one clip off, just run your hand underneath the panel. You'll start to feel it getting closer to the door, that's where another clip is. Once you get up to the top right corner, the little triangle piece is held together with another clip. It will probably fly off and go in the grass and you'll spend 5 minutes searching for it. Once you find it, store it in a safe place.
Now, once all the clips are removed, you still won't be able to fully remove the panel. There's one last step. But before you do that step, go ahead and remove the window and door lock controls. It's held on by one of Satan's creations. After 15 minutes of cussing, remove the wire connector from the controls, and set it aside.
Finally, remove the panel. Make SURE you have all the clips removed. Once they're removed, grab the panel from the side and pull up and toward yourself. It should pop right out. Set it aside. And it should be looking like this.
Next, remove the metal "door handle". It's held on by two bolts. Once that is out of the way, remove the plastic and expose the guts of your door. My phone started overheating and I forgot to snap a picture but you also need to remove the black metal piece that covers up the big hole in your door. Once all of that is out of the way, it should look like this..
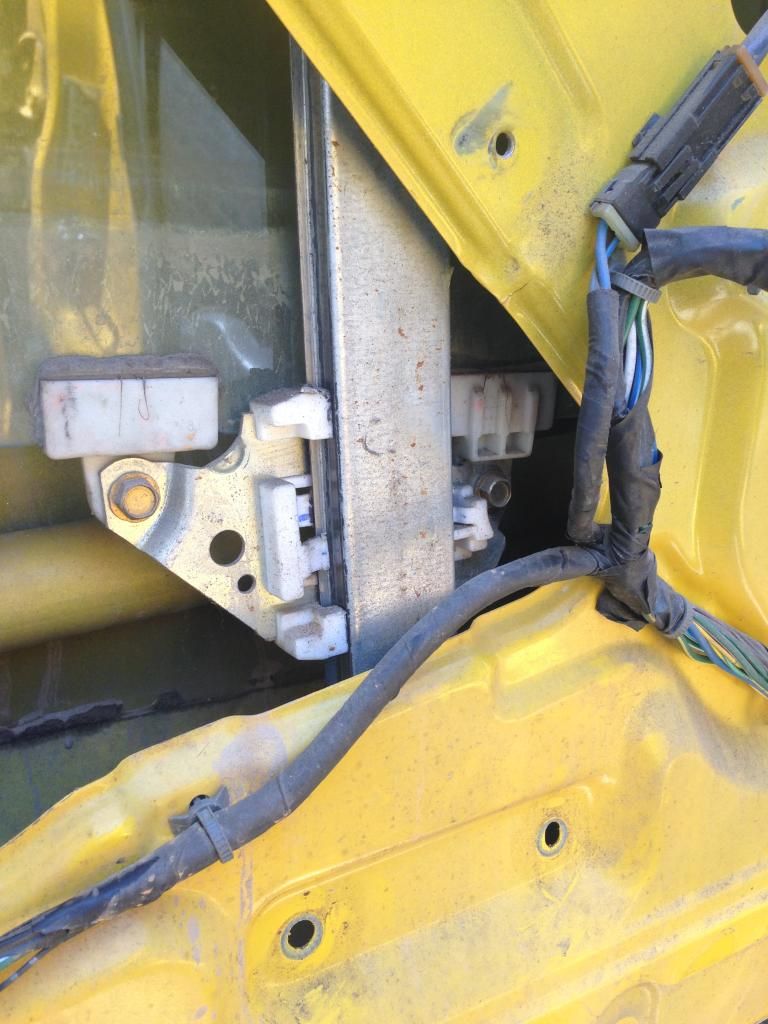
Next step, you can temporarily plug Satan's connector in (not all the way, just enough to make a connection) and roll down the window until the bottom of it is accessible.
Next, I went ahead and marked the things you're going to need to remove to get the regulator/motor out. Bolts in red and the wire connector in blue (don't worry, this one is easier
). Once all of this is removed, the regulator and motor are free from the door but are still connected to the window.
Next, remove these last two bolts and the regulator and motor are free. Just be sure to hold the window while you unbolt the two bolts. You may need an extension for the bolt closest to the interior of your X.
Once the bolts are out, be careful and wiggle the regulator and motor out of the hole, still holding on the window. You need to be careful here so you don't scratch the window while getting the regulator and motor out. Once it is out, carefully let the window down. You should now have the regulator and motor out and your replacement ready to swap.
Now, I'm just replacing my regulator, not the motor. If you're replacing both you can skip this step because I'm pretty sure they come together. If you are JUST replacing the regulator like I am, or the regulator and motor come separately, this is what you need to do.
There are three screws that hold the motor to the regulator. Undo those screws from the old regulator and toss it aside. Get your new regulator and align the motor correctly and screw it up. It's now ready for reinstall!
This next step needs a friend. Carefully slide the window up and have your friend keep up as far as it will go. This can be tedious but it gives you the most room for the reinstallation of the new regulator. Slide the new regulator and motor in the hole and align it up where the old one went. Be sure get the wire for the motor though the small hole before you tighten up the seven bolts.
Once the new regulator and the seven bolts are in and you've connected the wires, give your friend a well needed break. Carefully slide the window down until the holes line up with the new regulator and reinstall those two bolts.
From here, it's reassembly of everything you just took off. Just read this backwards and you're done!! Just be sure to clean your dirty window and you're ready to cruise with the windows down
Stay cool everyone!
Last edited: