Rearview Camera Questions

Simmo

Test Drive
Location
NJ
I want to install a rear view camera on my new Xterra, and I have some questions.

After staring at the back for a while, I decided the best place for the camera was right above the rear license plate on the stock bumper. That area is indented so there is an overhang there beneath the top step surface to attach the camera underneath where it will be protected from accidental impacts but still afford a good central view.

First problem I noted was that the license plate lights will shine into the camera at night, effectively blinding it. So, first question:

Is it possible to take a lead from the reverse lights and wire it to those lights somehow where it will shut them off when I am in reverse? Some sort of electronic switch.

Second, if I am going to mount this to the bumper, I imagine the best way to route the lead to the head unit is just under the car and fish it through the firewall? Does everyone agree with that? Anything I should be aware of/areas I should avoid when I am running a cable under the car?​
 

Simmo

Test Drive
Location
NJ
On the first question, looks like I need an SPST NC relay or an SPDT relay to get this to work.

If I wire the power to the license plate lights through this relay, I can take a feed from the reverse lights and it will switch the relay.

The first relay will stay closed with no power (i.e., not in reverse), so the lights will work. If power is applied (reverse lights on), the relay will open and the license plate lights will turn off.

The second relay, I could just run the lights off of one pole, and when power is applied, as per above, the relay will move to the second pole and cut power to the lights.
 

TN4x4Xterra

Suspension Lift
Location
Knoxville, TN
Or just get yourself a rear camera license plate holder....it puts the camera past the license plate lights.

Simple $20 mod....I have it on mine and it's great.
 

Simmo

Test Drive
Location
NJ
That is enough to clear the lights? I am going to mount the camera where that bracket would put it anyway.
 

TJTJ

Skid Plates
Founding Member
Location
NJ
If backing up at night, reverse lights can be useful, so disabling them might be counter productive.
 

caseycamby

Suspension Lift
Location
Marion, NC
If backing up at night, reverse lights can be useful, so disabling them might be counter productive.

I think he's talking about disabling the license plate lights while reversing. I'm pretty sure a relay will do that. Somehow. I'm not the one to tell you how haha :D
 

Kirk_R

First Fill-Up (of many)
Location
Keller TX
I literally just did a full stereo system install on mine and added a backup camera (license plate style with IR LEDS) a couple weeks ago. When using this at night with no mods to the way my reverse lights work, it works great at night, the lighting is perfect. You might be over thinking this project. I can get pictures if you like as well as provide you a link to the product I bought off Amazon.
 

TJTJ

Skid Plates
Founding Member
Location
NJ
I literally just did a full stereo system install on mine and added a backup camera (license plate style with IR LEDS) a couple weeks ago. When using this at night with no mods to the way my reverse lights work, it works great at night, the lighting is perfect. You might be over thinking this project. I can get pictures if you like as well as provide you a link to the product I bought off Amazon.

My old back up camera got smooshed by an F250, and I need another one...sure, share your link.

:D
 

Simmo

Test Drive
Location
NJ
I literally just did a full stereo system install on mine and added a backup camera (license plate style with IR LEDS) a couple weeks ago. When using this at night with no mods to the way my reverse lights work, it works great at night, the lighting is perfect. You might be over thinking this project.

Yes, perhaps you are right. I just read some other people complaining about their rear view cameras being "blinded" at night, so I just assumed I wouldn't want light being shined directly into it at night. I also have the IR LED style and I will be mounting it near the license plate.

May I ask how you routed the coax lead to the head unit?

Is it better to go under the truck to get to the front, then through the fire wall? Or do you take it internal at the back and run it under carpets/headliner?
 

Kirk_R

First Fill-Up (of many)
Location
Keller TX
I definitely ran my wires inside the vehicle. Straight up from the license plate under the rear door seal and down the drivers side. I pulled my rear panel off and found my reverse light hot wire and did a poke and wrap method to gain access to a source for the reverse light input on the head unit as well as used that to provide the power source for the camera, a "Y" connection. I grounded the ground wire from the camera near the tail light as well, just to keep it simple. Then I ran the video cable and the reverse light wires up to my head unit. Not really under the carpet, but just in between the carpet and the plastic door bottoms ( sorry I'm not sure if that's the technical term). Pretty straight forward. And hear is what it looks like.
 

Attachments

  • image-3458164015.jpg
    image-3458164015.jpg
    30.4 KB · Views: 23
  • image-2828731184.jpg
    image-2828731184.jpg
    30.9 KB · Views: 24
Last edited:

Prime

Shut up Baby, I know it!
Admin
Location
Denver Adjacent
Yes. You can tap the reverse lights for both camera power and reverse signal for the head unit. As far as wiring, I'd come up under the carpet. That way your RCA connection for the camera stays nice and dry.
 

Simmo

Test Drive
Location
NJ
So I actually installed this on Saturday the 12th before reading your most recent replies.

I had already ordered a relay off of Amazon for a few bucks, so I went ahead and installed it and it works perfectly. Here are some details if anyone else is interested:

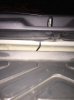
- If you tuck your head under the back bumper, you will see the power supply to the plate lights pretty clearly. It helps if you drop the spare tire to the ground or it gets in your way. The leads to the individual lights connect on the right of the plate area as you are looking at it (driver side). They are wrapped in your typical ribbed automative wire cover.

- Just before they come together, the lead from the passenger side light is held by a little plastic clip to a small metal flange that hangs down vertically from the body work (as opposed to the bumper). Just after the junction, the single power supply that is coming from the driver side rear corner is also clipped to this same flange.

- If you pop out this plastic clip after the junction without breaking it, you've got two things. After clipping the plastic loop (kind of looks like a zip tie) that holds the wire to the clip with a side cutter, you've got a fastener you can reuse to mount the relay. You also have a nice spot to splice into the power supply to the lights.

- I pulled the two wires from out of the ribbed cover and picked one at random. It doesn't matter which one. Tuck one back in and cut the other. Strip some length from both sides and attach female spade connectors. These will connect to the male spades numbered 30 and 87a on a standard SPDT relay. It doesn't matter which side you connect to which spade. You will not use spade 87, so you can tape that off if you like (I prefer to put a female spade connector on it that isn't attached to anything).

- Next, pop off the driver side tail light assembly. There are two bolts holding it on that you can access with the rear door open, and then some snaps so you have to pop it off with some force. There should be a red wire in there, three green wires and a number of black wires. You want the red wire, but just to confirm in case your wires aren't colored correctly, you want the live wire going into the reverse light, which is the middle bulb.

- Splice a line into this red wire between the bulb and the junction. You will notice a small gap at the bottom of the body work behind the rear tail light between the body and the fender. Drop the splice down this gap and it will drop nicely behind the bumper/fender, and you can feed it over to where you are putting your relay together.

- Cut to length (but leave a reasonable amount of slack for changing rear tail light bulbs in the future - you need to be able to take the assembly off again without your splice snagging) and pop another female spade connector onto the end of your splice. You will probably also want to use this line to power your rear view camera, so keep that in mind too and leave some room to run another splice as well. You want to attach this to male spade 86 on your relay.

- The last thing you have to do is ground your relay. I drilled a small pilot hole in the metal flange mentioned earlier, and grounded to that with a self tapping machine screw and a ring connector on the end of a small length of wire. I also grounded my camera to this spot on a separate line directly to the screw. This ground needs to be connected to male spade 85 on your relay.

- The relay is now fully wired and ready to go. Most automotive relays will come with a rectangular metal piece for fastening. I fastened it to the pre-existing hole that the plate light power line was secured to with that plastic clip I saved from earlier.

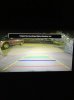
- Now your rear plate lights will work just as they did before, except when you pop your vehicle in reverse, which will turn them off. Taking your vehicle out of reverse will turn them right back on (assuming your side lights or headlights are on of course).
 
Last edited:

Simmo

Test Drive
Location
NJ
As for the coax line to the head unit, I ended up running it underneath the car to the driver footwell.

It was easy enough to find reasonable places to route the wire were it wouldn't get pinched by moving suspension parts or anything like that, and zip tie it where necessary to keep it nice and tight where I wanted it and slack where it made sense. The only thing is it runs near the gas tank which isn't technically the safest thing to do, but the line is only powered when I am in reverse, so not a big deal imo.

I was going for the holes in the firewall near the clutch pedal, but upon getting to the front, realised there is a lot in the way of that which made it very difficult to even attempt. So I didn't even bother trying and found a hole at the bottom of the floor pan instead to run the wire through. It is under the carpet in the driver's foot well. Easy to find from underneath because it is filled with a black sealant that should be sticky to the touch. It comes out in the middle of the foot well front to back and towards the door side to side, and you can just push through it with a screw driver.

It was easy enough to run it under the carpet from there to the center console stack, and I backfilled the hole in the plug I made with some latex caulk.

Hopefully it all holds up.

My only problem is I had to pop up the plastic trim around the bottom of the door and towards the clutch pedal to get under the carpet. Most of it went back fine, but I can't get the piece of plastic that is basically the threshold under the driver door to clip back in towards the B pillar. It clips back in fine towards the front.

Does anyone know how those clips work and how to get them to re-engage? There is a long clip molded into the plastic threshold and these round white things that I assume they are supposed to grip, but I can't get them to.
 
Last edited:
Top