
I’ve been looking into the forums for different pieces of information regarding the lift options for a 1st gen. Some, if not most, of the information is out there, just all over the place.
This is an effort to consolidate the options, information, and links to the instructions, how-to’s, and parts purchasing.
Please offer any suggestions and corrections to the information that I may have gotten wrong.
Special thanks to all the guys who have helped guide and provide info. (TJTJ, drbandkgb etc.)
The format I will use is Lift type, quick description, materials needed (must have), possible concerns, nice to have materials (to address concerns), link to a DIY & links to purchase parts.
Images
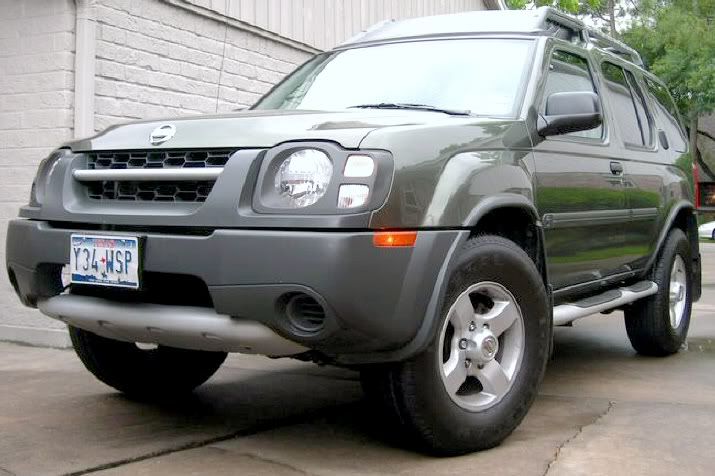
A stock x:
With a PML

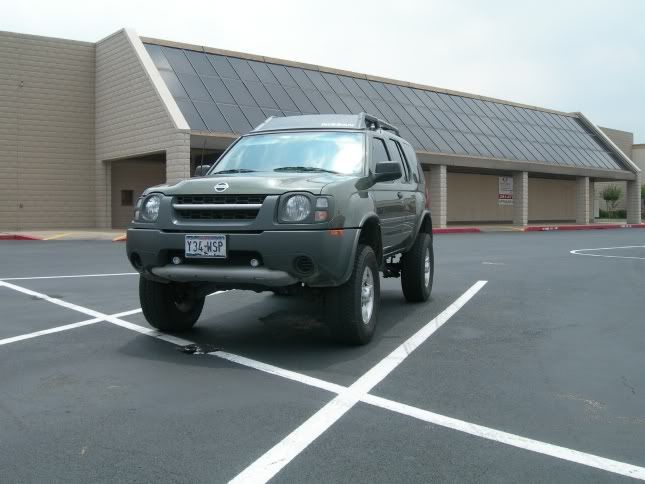
With a 3" SL and 1.5" wheel spacers
PML and BL
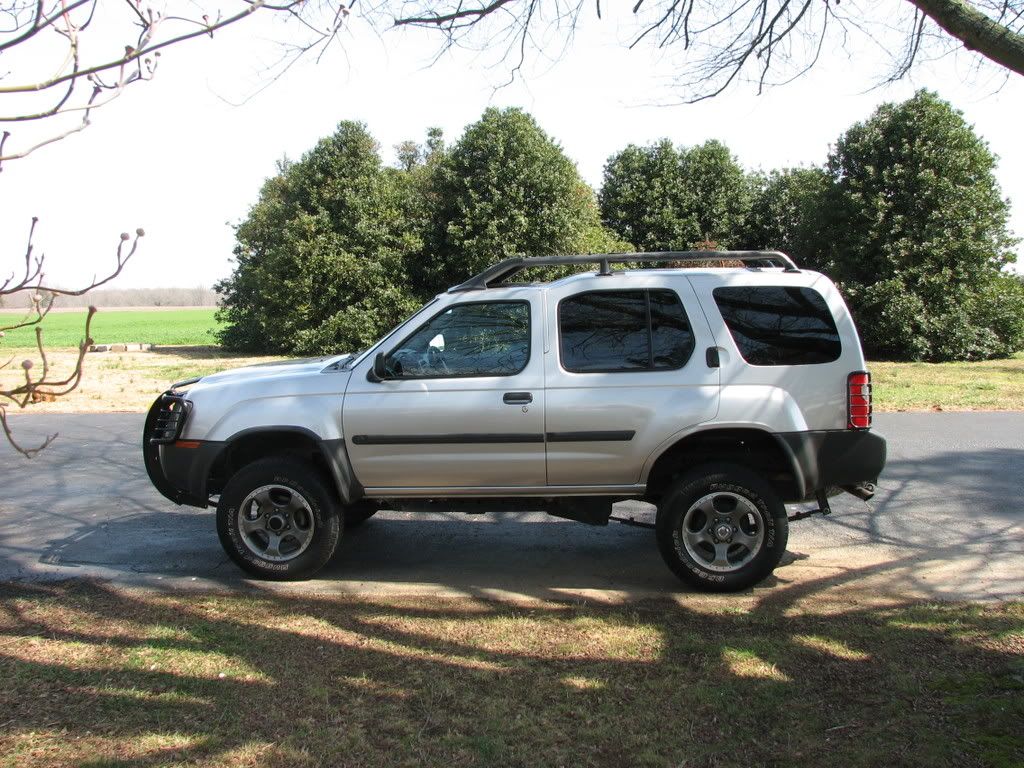
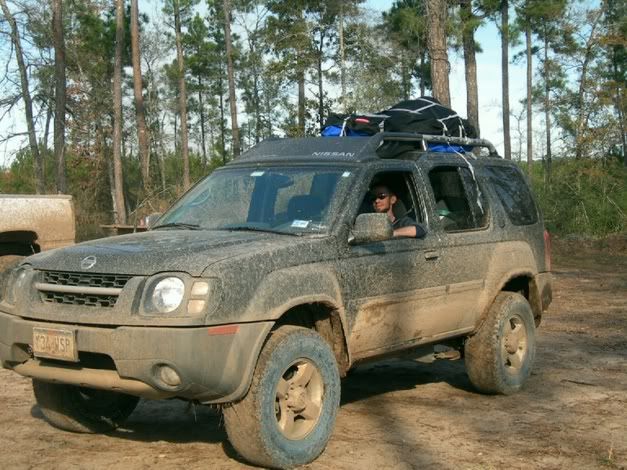
3" SL, BL, and 33's

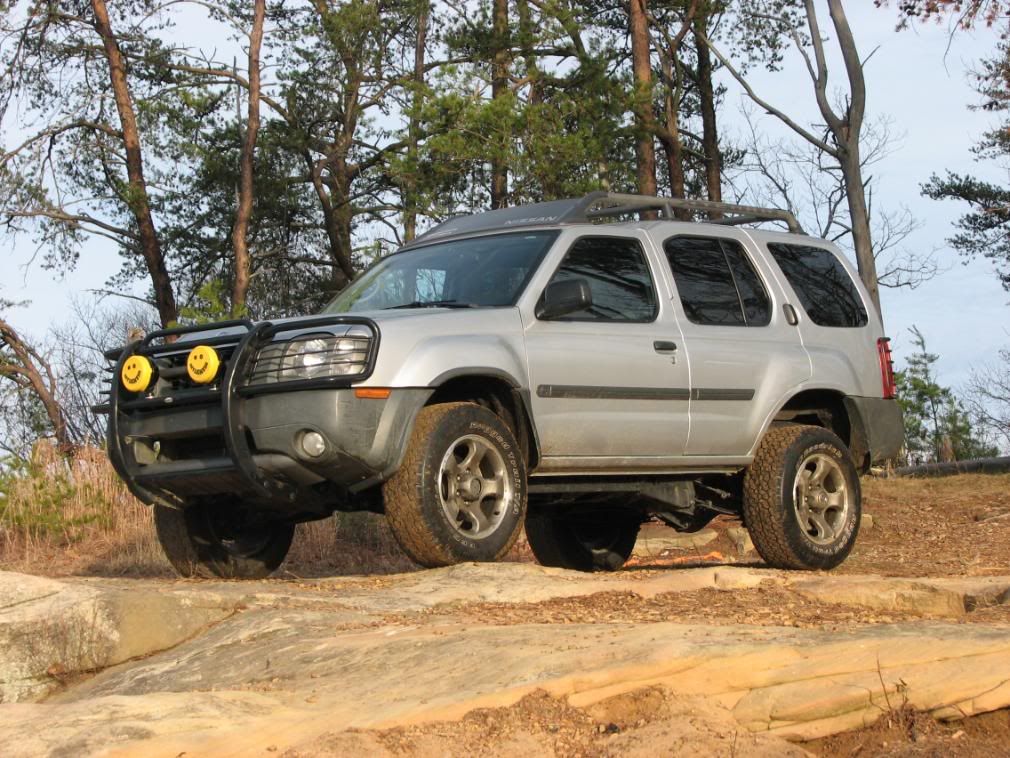
PML, BL, Upper Control Arms, and 33's

Refer to the above pictures to decide which is right for you.
---
Lift type
Body Lift (aka BL)
quick description
For the 1st gen a body lift of 2†is recommended, more than that begins to involve relocation of parts in the engine compartment (lines, radiator, etc).
The reason to get a BL is to be able to fit larger tires, as it lifts the body away from the tire itself, where as the SL still can only fit a certain size while the tire is “stuffed†or compressed.
The largest size that can fit with minimal cutting BEFORE a BL is a 32â€x11.5 (depending on tread).
After a BL you are able to fit 33’s or larger.
materials needed (must have)
possible concerns/notes
Need XN Links for DIY BL material and BL DIY
Link for BL http://www.xterranation.org/showthread.php?21-DIY-Body-lift-parts
Links to purchase parts.
Lift type
Poor Man’s Lift (aka PML)
quick description
A PML is a type of Suspension Lift (SL), that gives you a 1.5†lift without requiring additional hardware or changes.
It is termed PML because it requires very little in terms of extra gear and basically costs $65 to get this lift.
The lift is gained by adding shackles to the rear (replacing the stock shackles) and raising the torsion bars in the front.
materials needed (must have)
Nice to have materials (e.g. to take care of the concerns)
Need DIYs for TB indexing, re-indexing and Shackle install
links to purchase parts
---
Lift type
3†Suspension lift (SL)
quick description
3†suspension lift is created by finishing out the PML with additional parts to help you gain the lift. Doing a full SL raises you COG more than doing a PML and BL would otherwise (as you are raising the body and frame here up a full 3â€)
materials needed (must have)
Need DIYs for UCA install, AAL or Pack install, Shackle install
links to purchase parts
This is an effort to consolidate the options, information, and links to the instructions, how-to’s, and parts purchasing.
Please offer any suggestions and corrections to the information that I may have gotten wrong.
Special thanks to all the guys who have helped guide and provide info. (TJTJ, drbandkgb etc.)
The format I will use is Lift type, quick description, materials needed (must have), possible concerns, nice to have materials (to address concerns), link to a DIY & links to purchase parts.
Images
A stock x:
With a PML
With a 3" SL and 1.5" wheel spacers
PML and BL
3" SL, BL, and 33's
PML, BL, Upper Control Arms, and 33's
Refer to the above pictures to decide which is right for you.
---
Lift type
Body Lift (aka BL)
quick description
For the 1st gen a body lift of 2†is recommended, more than that begins to involve relocation of parts in the engine compartment (lines, radiator, etc).
The reason to get a BL is to be able to fit larger tires, as it lifts the body away from the tire itself, where as the SL still can only fit a certain size while the tire is “stuffed†or compressed.
The largest size that can fit with minimal cutting BEFORE a BL is a 32â€x11.5 (depending on tread).
After a BL you are able to fit 33’s or larger.
materials needed (must have)
- 10 count 2â€h x 3â€w body pucks
- Extended grade 8 bolts
- (6) 7/16" x 6" x 14 (bolts) (the other 6 body mounts of the truck)
- (6) 7/16" x 14 lock nuts
- (12) 7/16" washers
- (2) M12 x 1.25 x 180mm (bolts) (rear of truck by bumper going up)
- (2) M10 x 1.25 x 160mm (bolts) (2nd to last body mount toward the rear bumper)
possible concerns/notes
- Before purchasing aftermarket bumpers and sliders you should make the decision regarding getting a bodylift as they are made specifically for a BL or not. However you can get bumper relocation brackets for the front and rear bumper but not the sliders.
- Some cutting of the area around the 4wd shifter may be needed.
- Easily snapped lines (e.g. Heater core) if you are not careful to unclip all of them before the lift.
- Be careful on the loosening and dropping of the steering shaft, make sure it is fully seated once loosened as part of the BL.
- If immediately putting on larger tires then begin to look at reinforcing parts of the steering.
- Post BL, none.
- IAB – Idler arm brace. Reinforces a weak point in our trucks. (Total Chaos, Calmini, AC)
- Reinforced TRA – helps reduce the chances of the current weak TRA bending on you if you take a hit offroad.
Need XN Links for DIY BL material and BL DIY
Link for BL http://www.xterranation.org/showthread.php?21-DIY-Body-lift-parts
Links to purchase parts.
- AC kit:https://www.4x4parts.com/nissan/xterra-inch-body-lift-p-337.html
- Self gathered kit:
- IAB:
- Total Chaos: http://www.chaosfab.com/nissanaccess.html
- Calmini: http://www.purenissan.com/idler_arm_brace.htm (cannot purchase through this link)
- AC: https://www.4x4parts.com/nissan/idler-arm-brace-p-59.html
- TRA: https://www.4x4parts.com/nissan/heavy-duty-tie-rod-adjustors-p-6361.html
Lift type
Poor Man’s Lift (aka PML)
quick description
A PML is a type of Suspension Lift (SL), that gives you a 1.5†lift without requiring additional hardware or changes.
It is termed PML because it requires very little in terms of extra gear and basically costs $65 to get this lift.
The lift is gained by adding shackles to the rear (replacing the stock shackles) and raising the torsion bars in the front.
materials needed (must have)
- Larger shackles to provide the 1.5†lift in the rear
- you will need an alignment afterwards or you will wear out your tires faster.
- per TJTJ
1. Set the Camber to 0°, or as close to it as
possible.
2. Try for getting the Caster to be between 0.3° and
0.6°, set differently between the right and left
side, with the left side being less than the right.
It doesn't matter what the Caster is, just as long as
you get the most Caster you can on the right
side, then set it so the left side is less by 0.3°
to 0.6°
Camber = 0.0°L.....0.0°R
Caster = 0.9°L.....1.2°R
Toe in = 0.08"L...0.08"R
Total toe = ...0.16"
- per TJTJ
- You *MUST* leave approx 0.5†space between the bumpstop and the UCA otherwise your ride will be rougher and you will wear out components faster.
- Note: make sure to unclip and re-clip the brake lines to give them appropriate slack for new articulation/droop
Nice to have materials (e.g. to take care of the concerns)
- upgraded shocks (for 3â€lift) will allow for more articulation in the back.
- IAB – Idler arm brace. Reinforces a weak point in our trucks.
- Reinforced TRA – helps reduce the chances of the current weak TRA bending on you if you take a hit offroad.
Need DIYs for TB indexing, re-indexing and Shackle install
links to purchase parts
- AC Shackles: https://www.4x4parts.com/nissan/xterra-rear-lift-shackles-p-145.html
- Shocks
- IAB:
- Total Chaos: http://www.chaosfab.com/nissanaccess.html
- Calmini: http://www.purenissan.com/idler_arm_brace.htm (cannot purchase through this link)
- AC: https://www.4x4parts.com/nissan/idler-arm-brace-p-59.html
- TRA: https://www.4x4parts.com/nissan/heavy-duty-tie-rod-adjustors-p-6361.html
---
Lift type
3†Suspension lift (SL)
quick description
3†suspension lift is created by finishing out the PML with additional parts to help you gain the lift. Doing a full SL raises you COG more than doing a PML and BL would otherwise (as you are raising the body and frame here up a full 3â€)
materials needed (must have)
- larger Shackles
- Redesigned UCA (upper control arms)
- AAL (add a leaf) or replacement leaf packs
- Lifting to the full 3†DOES NOT allow you to fit any larger tires than just having the PML, as anything that would hit while compressed with the PML will still hit/rub with the full SL.
- driving it like it is not lifted
- steering components will wear out faster if not replaced with beefier pieces (usually due to larger tires and changed angles)
- CV issues if fully drooped and pushing the vehicle. This is due to the angle change of the Diff. Putting in a Diff drop kit can help alleviate this.
- Better/Longer shocks (e.g. bilsteins for the 3†lift). This will allow for the longer articulation(wheel travel), improve ride quality, handling, etc. And it can help with the higher COG.
- Stiffer torsion bars up front can also help firm up the ride and allow for the added weight of armor you will eventually be adding.
- Extensions for the front sway bar vertical links will take the stress and wear off the sway bar end links, and help improve the ride/flex.
- Beefed up steering components, as noted before this is needed to stand up to the added stress of larger tires, changed angles etc.
- Longer brake lines.
Need DIYs for UCA install, AAL or Pack install, Shackle install
links to purchase parts
- Lift kit: https://www.4x4parts.com/nissan/200...-leaf-add-leaf-pack-c-435_437_519_12_446.html
- AC Shackles: https://www.4x4parts.com/nissan/xterra-rear-lift-shackles-p-145.html
- Leaf Springs
- AAL: https://www.4x4parts.com/nissan/leaf-addaleaf-pack-with-ubolts-p-2861.html
- Full Replacement Packs:
- Deaver: http://www.deaverspring.com/
- Alcan: http://www.alcanspring.com/
- Shocks:
- IAB:
- Total Chaos: http://www.chaosfab.com/nissanaccess.html
- Calmini: http://www.purenissan.com/idler_arm_brace.htm (cannot purchase through this link)
- AC: https://www.4x4parts.com/nissan/idler-arm-brace-p-59.html
- TRA: https://www.4x4parts.com/nissan/heavy-duty-tie-rod-adjustors-p-6361.html
- UCA
- SLR (search the forum for contact info)
- AC: https://www.4x4parts.com/nissan/xterra-front-suspension-lift-p-79.html
- Cam bolts: (good idea as usually they are rust welded) https://www.4x4parts.com/nissan/cam-bolts-p-6123.html
- Torsion Bars: https://www.4x4parts.com/nissan/xterra-torsion-bars-p-98.html
- Steering components: (beefier centerlink, reinforced pitman arm and idler arm)
- SLR (search the forum for contact info)
- AC: https://www.4x4parts.com/nissan/complete-steering-system-p-5256.html
- grassroots 4x4: http://www.grassroots4x4.com
- Total Chaos: http://www.chaosfab.com/nissanaccess.html
Last edited:
")