XB3TERRA
Test Drive
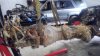
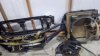
This was turning into a how-to thread over at the TNX so I guess I'll transfer it over. Stand-by while I move this over and sort through all the photos.
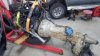
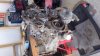
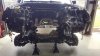
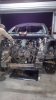
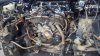
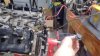
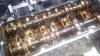
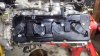
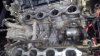
Donor vehicle was (RIP) a 2008 Titan Pro-4x (purchased for $1500), factory locker,
VK56 (E85), 336 gear ratio with 130K miles.
My Xterra (aka XB3) is a 2010 Off Road with 6-speed (369 gear ratio).
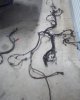
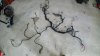
- remove both Titan & Xterra engine harness and Xterra alternator harnesses (minus the Titan knock sensor harness) and send to Driven Desire to modify for turn key installation- $350
- using Titan ECU, purchase Uprev laptop cable for datalogging (speed density, real world driving), disable VATS, email files to tuner and program to work with Xterra using UpRev software
- notch transmission for crank position sensor
- dual in, single out muffler with resonator to prevent drone
- upgrade power steering cooler with B&M suerpcooler w/ A/N fittings
I will clean up the thread as I go so if someone wants to do the swap as well so it won't be confusing. Transparency is key. I will posts costs, pics, and the carnage.
$$$$$$$$$$$$$$$$$$PURCHASE LIST$$$$$$$$$$$$$$$$$$$$$$$$$
PRG Titan motor/trans mounts- $278
Driven Desire VK56 to Xterra 6-speed adapter kit- $925
Up Rev data cable- $225 (Z1 Motorsports or Cajun B-pipes)
Driven Desire engine harness (merge Titan/Xterra alternator/Xterra engine)-$350~
Cajun Remote Tuning, ECU register, flash and tune- $600
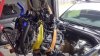
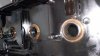
EXHAUST SYSTEM
Exhaust manifold nuts (X16) -14094jg30a- $68 (Amazon)
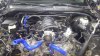
Doug Thorley Long Tube 1 5/8 headers 2.25 collector THY-481Y-LSO-C; built to order, 4-week wait- $655 EBAY
Cajun B-pipes- $305
Magnaflow reversible 2 in/1 out 2.5" muffler- P#12265- $120 (Amazon)
2.5" Stainless exhaust clamps X2- Espeeder- $18
2.5" 2 bolt(elongated), Stainless, Exhaust Flanges X2- Stainless Bros- $40(Amazon)
OEM VK56 EXHAUST MANIFOLD GASKETS x2 (14036-7S001)- $42.36 (AMAZON)
OEM CONNECTION PIPE GASKETS x4 (20692-65J00)- $47.16 (AMAZON)
Denso Upstream O2 sensors, pair- 234-9038 - $135 (Amazon)
Vibrant Resonator
VK56 REFRESH PARTS
Dipstick O-ring- 15066-7S020-
Oil Cooler O-ring- 21304-JA11A
Thermostat- 21200-1LA1AOil
pump to oil pan o-rings- 15066-7S010, 15066-7S000, 15066-AR000 (Courtesy)
Oil pressure regulator- 15241-43U00 (^^^^$19^^^)(Courtesy)
Power steering line; pump to rack (Gates)- $58 (eBay)
Intake manifold gasket kit; comes with throttle body seal (Felpro MS96945)- $32 (Amazon)
Timing cover crankshaft seal- 13510-0Z400- $8 (Amazon)
Injector upper/lower O-rings- ES70599,ES72004- $9 (Rock Auto)
Denso Iridium Sparkplugs (flexfuel,.44gap)- Denso 3450- $81 (Rock Auto)
Gates idle pulley- 36222 - $31 (Amazon)
OEM oil pressure switch- 25240-4m40e - $24 (Amazon)
OEM VK56 REAR CRANKSHAFT SEAL (122794Z001)- $28(EBAY)
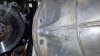
COOLING SYSTEM
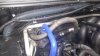
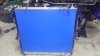
OFFROAD GORILLA VQ40 to VK56de aluminum radiator/silicon hoses- $504
V8 Pathfinder fan shroud- 21476-ZS20A (trim to fit)
LWR Fan Shroud- 21477-ZS20A (trim to fit)
Fan Clutch- 21082-7S00A
Water Pump- 21010-7S000
Water Pump Gasket- 21014-7S000
Heater Hose outlet- 92413-ea000- $14 (Courtesy)
Heater Hose Inlet- 92400-ea000- $12 (Courtesy)
Heater Hose Outlet- 92410-ea000- $13 (Courtesy)
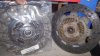
TRANSMISSION PARTS
Z1 PERFORMANCE STREET FULL FACED CLUTCH/MID WEIGHT FLYWHEEL- $718 !!!!Got $100 off for BLACKFRIDAY!!! ($618)
350Z 3.5DE KOYO Release Bearing
Flexplate OEM bolts X9- 01121-0072- $16 (Courtesy Nissan)
Shifter lever boot- 32862-ea200- $12 (Courtesy Nissan)
OEM Rear output seal, Transfer case- 33140-7S110- $25 (Amazon)
Crankshaft Position Sensor (Same as VQ40D/VQ3.5DE driver cam sensor) - 23731-AL61D
Refrigeration (using Titan A/C compressor)
V8 Pathfinder Low Pressure Hose (Compressor to fire wall)- 92480-ZS21A
Filter Drier- 83255- $23 (Amazon)
R134a Refrig (no additives)
Compressor oil (have some oil to lubricate all your o-rings before assembly)
If recovering and charging yourself....Tools required...do your homework or watch YouTube
Vacuum pump
R134 Manifold Gauges w/ 1/4" hoses and low/high side QDs 1/4" shutoff valve (for vucuum pump)
RobinAir Reclaimer (if you hug trees or want to reuse your refrigerant)
Refrigerant Recovery Tank
Vacuum gauge or watch manifold gauges
Gas leak (optional for troubleshooting leaks or just use thick soap dawn soap solution)
Donor vehicle was (RIP) a 2008 Titan Pro-4x (purchased for $1500), factory locker,
VK56 (E85), 336 gear ratio with 130K miles.
My Xterra (aka XB3) is a 2010 Off Road with 6-speed (369 gear ratio).
- remove both Titan & Xterra engine harness and Xterra alternator harnesses (minus the Titan knock sensor harness) and send to Driven Desire to modify for turn key installation- $350
- using Titan ECU, purchase Uprev laptop cable for datalogging (speed density, real world driving), disable VATS, email files to tuner and program to work with Xterra using UpRev software
- notch transmission for crank position sensor
- dual in, single out muffler with resonator to prevent drone
- upgrade power steering cooler with B&M suerpcooler w/ A/N fittings
I will clean up the thread as I go so if someone wants to do the swap as well so it won't be confusing. Transparency is key. I will posts costs, pics, and the carnage.
$$$$$$$$$$$$$$$$$$PURCHASE LIST$$$$$$$$$$$$$$$$$$$$$$$$$
PRG Titan motor/trans mounts- $278
Driven Desire VK56 to Xterra 6-speed adapter kit- $925
Up Rev data cable- $225 (Z1 Motorsports or Cajun B-pipes)
Driven Desire engine harness (merge Titan/Xterra alternator/Xterra engine)-$350~
Cajun Remote Tuning, ECU register, flash and tune- $600
EXHAUST SYSTEM
Exhaust manifold nuts (X16) -14094jg30a- $68 (Amazon)
Doug Thorley Long Tube 1 5/8 headers 2.25 collector THY-481Y-LSO-C; built to order, 4-week wait- $655 EBAY
Cajun B-pipes- $305
Magnaflow reversible 2 in/1 out 2.5" muffler- P#12265- $120 (Amazon)
2.5" Stainless exhaust clamps X2- Espeeder- $18
2.5" 2 bolt(elongated), Stainless, Exhaust Flanges X2- Stainless Bros- $40(Amazon)
OEM VK56 EXHAUST MANIFOLD GASKETS x2 (14036-7S001)- $42.36 (AMAZON)
OEM CONNECTION PIPE GASKETS x4 (20692-65J00)- $47.16 (AMAZON)
Denso Upstream O2 sensors, pair- 234-9038 - $135 (Amazon)
Vibrant Resonator
VK56 REFRESH PARTS
Dipstick O-ring- 15066-7S020-
Oil Cooler O-ring- 21304-JA11A
Thermostat- 21200-1LA1AOil
pump to oil pan o-rings- 15066-7S010, 15066-7S000, 15066-AR000 (Courtesy)
Oil pressure regulator- 15241-43U00 (^^^^$19^^^)(Courtesy)
Power steering line; pump to rack (Gates)- $58 (eBay)
Intake manifold gasket kit; comes with throttle body seal (Felpro MS96945)- $32 (Amazon)
Timing cover crankshaft seal- 13510-0Z400- $8 (Amazon)
Injector upper/lower O-rings- ES70599,ES72004- $9 (Rock Auto)
Denso Iridium Sparkplugs (flexfuel,.44gap)- Denso 3450- $81 (Rock Auto)
Gates idle pulley- 36222 - $31 (Amazon)
OEM oil pressure switch- 25240-4m40e - $24 (Amazon)
OEM VK56 REAR CRANKSHAFT SEAL (122794Z001)- $28(EBAY)
COOLING SYSTEM
OFFROAD GORILLA VQ40 to VK56de aluminum radiator/silicon hoses- $504
V8 Pathfinder fan shroud- 21476-ZS20A (trim to fit)
LWR Fan Shroud- 21477-ZS20A (trim to fit)
Fan Clutch- 21082-7S00A
Water Pump- 21010-7S000
Water Pump Gasket- 21014-7S000
Heater Hose outlet- 92413-ea000- $14 (Courtesy)
Heater Hose Inlet- 92400-ea000- $12 (Courtesy)
Heater Hose Outlet- 92410-ea000- $13 (Courtesy)
TRANSMISSION PARTS
Z1 PERFORMANCE STREET FULL FACED CLUTCH/MID WEIGHT FLYWHEEL- $718 !!!!Got $100 off for BLACKFRIDAY!!! ($618)
350Z 3.5DE KOYO Release Bearing
Flexplate OEM bolts X9- 01121-0072- $16 (Courtesy Nissan)
Shifter lever boot- 32862-ea200- $12 (Courtesy Nissan)
OEM Rear output seal, Transfer case- 33140-7S110- $25 (Amazon)
Crankshaft Position Sensor (Same as VQ40D/VQ3.5DE driver cam sensor) - 23731-AL61D
Refrigeration (using Titan A/C compressor)
V8 Pathfinder Low Pressure Hose (Compressor to fire wall)- 92480-ZS21A
Filter Drier- 83255- $23 (Amazon)
R134a Refrig (no additives)
Compressor oil (have some oil to lubricate all your o-rings before assembly)
If recovering and charging yourself....Tools required...do your homework or watch YouTube
Vacuum pump
R134 Manifold Gauges w/ 1/4" hoses and low/high side QDs 1/4" shutoff valve (for vucuum pump)
RobinAir Reclaimer (if you hug trees or want to reuse your refrigerant)
Refrigerant Recovery Tank
Vacuum gauge or watch manifold gauges
Gas leak (optional for troubleshooting leaks or just use thick soap dawn soap solution)
Last edited: